


spongey437
-
Posts
18 -
Joined
-
Last visited
Posts posted by spongey437
-
-
For a different type of effect using a similar technique you could also make a polaroid collage out of just one picture like this:

Same basic technique, different end effect. sorry about the quality of the picture but I shrunk it down from a larger version so it looks a bit jagged on the edges of the photos, but you get the idea.
-
This effect can already be done with this plugin:
http://boltbait.googlepages.com/Gradient.dll
Choose the ending colors for primary and secondary, then run the effect and choose the Long HSV method.
Description of this effect can be found here: viewtopic.php?t=2294
My bad. I didnt have that one and I really had thought I had downloaded all the plugins.
-
Still playing around with the Codelab and thought I would try to create a rainbow effect. Here is what I came up with. Run on just a blank page it will create something like this:

But my use for it was to do something like this.


Right now it just creates the rainbow as you see it here with the colors stretching vertically down the page. It works for selections as well, but only rectangular ones. It still creates something with weird shaped selections, but it is all screwed up and I cant seem to wrap my hands around how to program around it. Also, if I had more programming experience I would have liked to have set this up like a gradient tool, but at least for now it just does the rainbow.
I have set up three selection bars for Red, Green and Blue starting colors. You can create different rainbow effects by playing with the starting colors, but the default settings will give you your standard rainbow (though for some reason the size of the image can affect how far down the color scale it gets. For example on an 800x600 image it seems to stop at light blue, but for a smaller images reaches purple and even sometimes makes it back to red - which was the intent when programming it).
Here is the code in case anyone is interested.
int Amount1=255;	//[0,255]Red Start
int Amount2=0;	//[0,255]Green Start
int Amount3=0;	//[0,255]Blue Start

void Render(Surface dst, Surface src, Rectangle rect)
{
   PdnRegion selectionRegion = EnvironmentParameters.GetSelection(src.Bounds);

   // Delete any of these lines you don't need
   Rectangle selection = this.EnvironmentParameters.GetSelection(src.Bounds).GetBoundsInt();

   long CenterX = (long)(((selection.Right - selection.Left) / 2)+selection.Left);
   long CenterY = (long)(((selection.Bottom - selection.Top) / 2)+selection.Top);
   ColorBgra PrimaryColor = (ColorBgra)EnvironmentParameters.PrimaryColor;
   ColorBgra SecondaryColor = (ColorBgra)EnvironmentParameters.SecondaryColor;
   int BrushWidth = (int)EnvironmentParameters.BrushWidth;

   int l = 1;
   int p = 1530 / rect.Right;
   int r = Amount1;
   int g = Amount2;
   int b = Amount3;

   ColorBgra CurrentPixel;
   for(int y = rect.Top; y < rect.Bottom; y++)
   {
       for (int x = rect.Left; x < rect.Right; x++)
       {
           if (selectionRegion.IsVisible(x, y))
           {
               CurrentPixel = src[x,y];
               // TODO: Add pixel processing code here
               if (x == rect.Left)
               {
                   r = Amount1;
                   g = Amount2;
                   b = Amount3;
               }

               switch(l)
               {
               case 1:

                   g = g + p;
                   if (g > 255)
                   	{
                       g = 255;
                       l = 2;
                       }
                   break;

               case 2:

                   r = r - p;
                   if (r < 0)
                   	{
                       r = 0;
                       l = 3;
                       }
                   break;

               case 3:

                   b = b + p;
                   if (b > 255)
                   	{
                       b = 255;
                       l = 4;
                       }
                   break;

               case 4:

                   g = g - p;
                   if (g < 0)
                   	{
                       g = 0;
                       l = 5;
                       }
                   break;

               case 5:

                   r = r + p;
                   if (r > 255)
                   	{
                       r = 255;
                       l = 6;
                       }
                   break;

               case 6:

                   b = b - p;
                   if (b < 0)
                   	{
                       b = 0;
                       l = 1;
                       }
                   break;
               }


               // Access RGBA values this way, for example:
                  CurrentPixel.R = (byte)r;
                  CurrentPixel.G = (byte)g;
                  CurrentPixel.B = (byte)b;
               // CurrentPixel.A = (byte)PrimaryColor.A;
               dst[x,y] = CurrentPixel;
           }
       }
   }
}
Thanks to Miguel for showing me the 'switch' routine to use (which apparently runs faster than a bunch of if statements). I incorporated it into this and remembered to add an icon this time.
Let me know what you think. here is the link to the plugin http://Spongey437.googlepages.com/rainbow3.dll
-
I was looking for a way to make vertical or horizontal lines across a whole image (or a selected region) and who knows, maybe this is already out there somewhere but I also wanted to play around with the CodeLab so i thought I would write it up myself.
So here is what it will create -
Pretty simple, and even with my limited knowledge of programming I was able to use CodeLab to come up with it. The effect has two slider bars. The first sets the width between the lines (defaults to 10, and I maxed it out at 100, minimum is one but that actually just paints the whole page one color). It uses whatever your primary color selected is as the color of the lines. The second slider is just to determine whether you want Vertical or Horizontal lines (1 for vertical, 2 for horizontal).
Here is the source code in case anyone was interested - like I said it is a pretty simple code but it might help some new people see how CodeLab works. Thanks to BoltBait for his tutorials on writing CodeLab plugins as well, they were very helpful. Looking at the code below, all it does is check to see if you want it horizontal or vertical. Then it goes through every pixel and calculates whether that pixel is a factor of the width that you have set. If it is, it writes to that pixel, if not it does nothing.
int Amount1=10; //[1,100]Width
int Amount2=2; //[1,2]X - Y


void Render(Surface dst, Surface src, Rectangle rect)
{
    PdnRegion selectionRegion = EnvironmentParameters.GetSelection(src.Bounds);

    // Delete any of these lines you don't need
    Rectangle selection = this.EnvironmentParameters.GetSelection(src.Bounds).GetBoundsInt();

    long CenterX = (long)(((selection.Right - selection.Left) / 2)+selection.Left);
    long CenterY = (long)(((selection.Bottom - selection.Top) / 2)+selection.Top);
    ColorBgra PrimaryColor = (ColorBgra)EnvironmentParameters.PrimaryColor;
    ColorBgra SecondaryColor = (ColorBgra)EnvironmentParameters.SecondaryColor;
    int BrushWidth = (int)EnvironmentParameters.BrushWidth;

    ColorBgra CurrentPixel;
    for(int y = rect.Top; y < rect.Bottom; y++)
    {
        for (int x = rect.Left; x < rect.Right; x++)
        {
            if (selectionRegion.IsVisible(x, y))
            {
                CurrentPixel = src[x,y];
                // TODO: Add pixel processing code here
                if(Amount2 == 1)
                {
                    if (x % Amount1 == 0)
                    {
                        // Access RGBA values this way, for example:
                        CurrentPixel.R = (byte)PrimaryColor.R;
                        CurrentPixel.G = (byte)PrimaryColor.G;
                        CurrentPixel.B = (byte)PrimaryColor.B;
                        CurrentPixel.A = (byte)PrimaryColor.A;
                    }
                }

                if(Amount2 == 2)
                {
                    if (y % Amount1 == 0)
                    {
                        // Access RGBA values this way, for example:
                        CurrentPixel.R = (byte)PrimaryColor.R;
                        CurrentPixel.G = (byte)PrimaryColor.G;
                        CurrentPixel.B = (byte)PrimaryColor.B;
                        CurrentPixel.A = (byte)PrimaryColor.A;
                    }
                }

                dst[x,y] = CurrentPixel;
            }
        }
    }
}
Well, that's it - my first plugin.
Here is the link to the dll - http://Spongey437.googlepages.com/lines.dll
Also, this effect will appear in the Render submenu in PdN. I don't know about you guys but I wish all the effects were subgrouped in some way as there are a ton of them now and they go off the page. -
Well, in reply to jsonchiu's request to post something that can be done with it (Great plugin BTW - I had posted a tutorial on how to do this manually earlier) here is a cool looking frame I came up with using just the bevel effect here.
Request - any way that you can get it to support odd shapes? Right now it only creates square box bevels. So if you select a round shape, it doesnt work quite right on it.
Anyway, here's the pic

-
Very nice.
-
Other things you could try to get rid of some of the roughness are the median blur, or try the oil painting effect. I usually use that to smooth things out a bit.
-
First you have to save it online somewhere, then just use the location for that site and image.
-
Try this tutorial for doing that.
-
When you save it as a .JPG image, in PDN in gives you the option to select how much you want to change the quality. It usually defaults to 100%, but if you change it to 50% you might still keep a decent image but it will decrease the file size.
Also, try a saving it as a few different file types - GIF files are typically the smallest I think. PNG files are typically much larger.
-
Awesome tutorial - very detailed and easy to follow.
Here is mine

-
Spongey, that's pretty amazing. The spiderman/venom one is my favorite. Was that all one picture, or did you find 2 separate ones?
You can do it with two pictures but I find that it flows best if the two images come from one picture - the spiderman/venom one was from one picture (as were the other two).
-
Using the "Let's make a software box" tutorial, I came up with this:

-
Sorry, I was trying this tutorial, but since I'm new, I think it's a bit confusing. I'm not really sure what you meant with moving the black layer over the other one. Please help.
If you open the layers window in Paint.net (usually located in the bottom right corner) you can see all the different layers you have created. There is a button there to move a layer up or down so that it essentially will lay on top of another layer (or move it down so it is under another layer).
Hope this helps.
Jeff
-
Here are a few more examples of what I did with this technique.


-
 This was my atempt at the tutorial. Please tell me what I need to change or fix. =) Thanks!
I think I would have pushed the cross farther to the left so that it came out of the picture on both the top and the left side and then put the text on the right.
-
This tutorial is available as a PDF. Click here to view or download the PDF
Plugins used are: Outline Object & Feather by @BoltBait
This is my first attempt at a tutorial, so bear with me. I hadn't seen anyone do anything like this and saw it on a Photoshop tutorial and decided to see if I could do it in Paint.net.
Mod note 4/7/21: I have re-done this tutorial by @spongey437 as his images disappeared. I've used an image from Splash and have slightly altered one step. @Pixey
It will create an effect that will make it look like something is walking right out of a picture, like this:
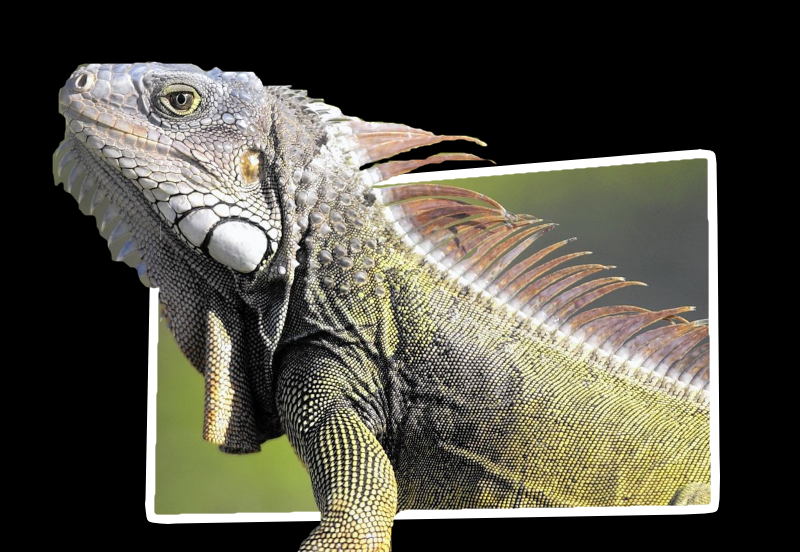
First, find a picture where it will look natural for something to be coming out of the picture - in this case I am using this picture of an iguana:
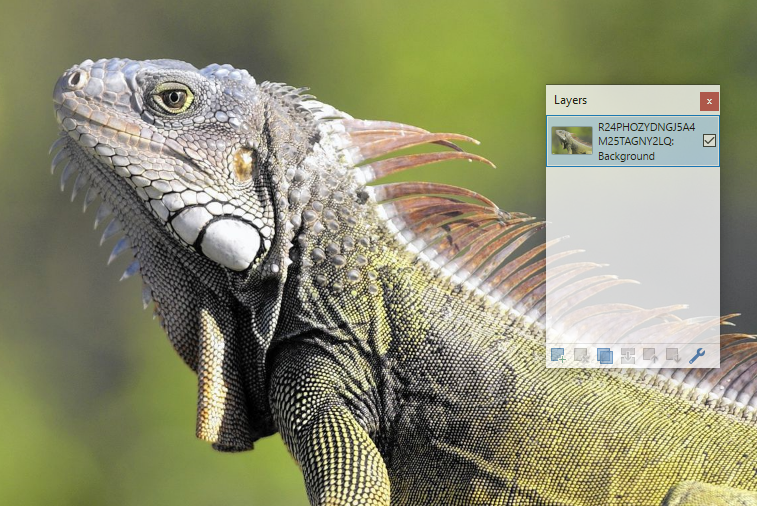
Duplicate the layer so you have two layers of the picture.
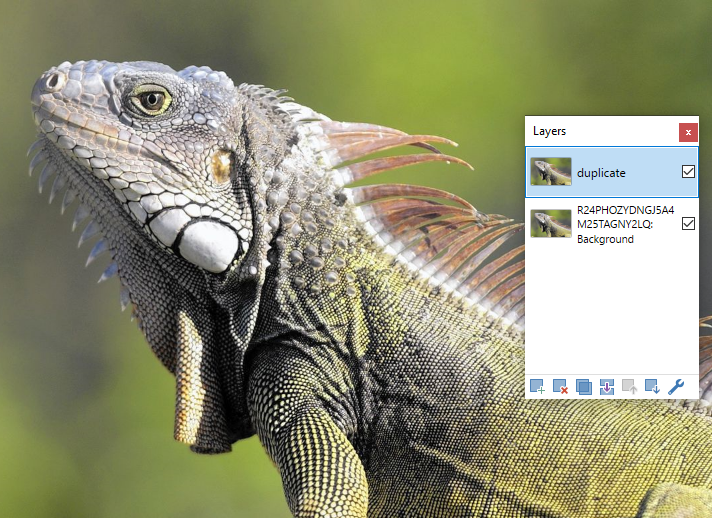
Next create a new layer and create a shape similar to what I have here. This is going to be the frame of the picture, so the parts you want to be coming out of the picture should be out of this box. The shape gives the picture a somewhat 3d appearance.
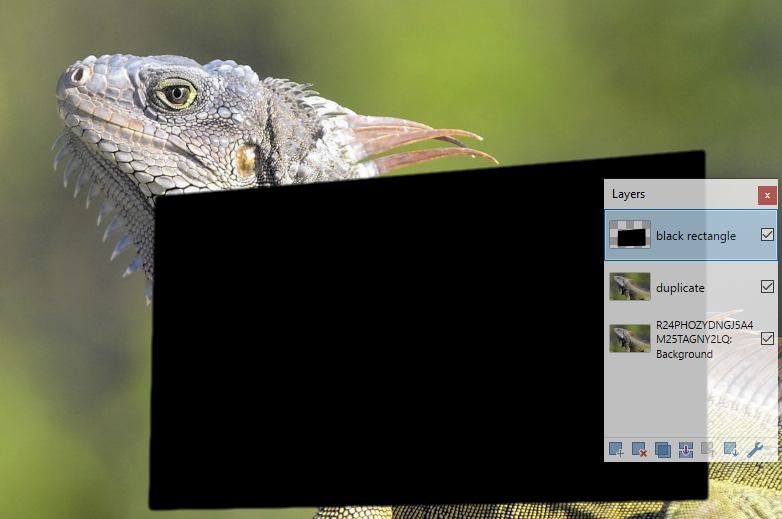
Select the black box and then select the second picture layer. Invert the selection and hit delete so all that remains is the picture that is in the shape of the box.

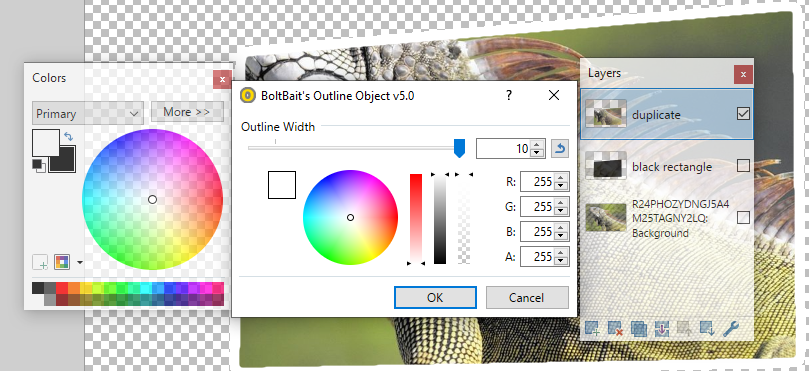
Move this layer above the black box layer. On the duplicated smaller image use @BoltBait's Outline selection to create a white frame around the picture.
Once this is done you can then merge these two layers together so you should now have a layer that has the whole picture on it and one that has a framed out chunk of the picture. You may now delete the black box layer.
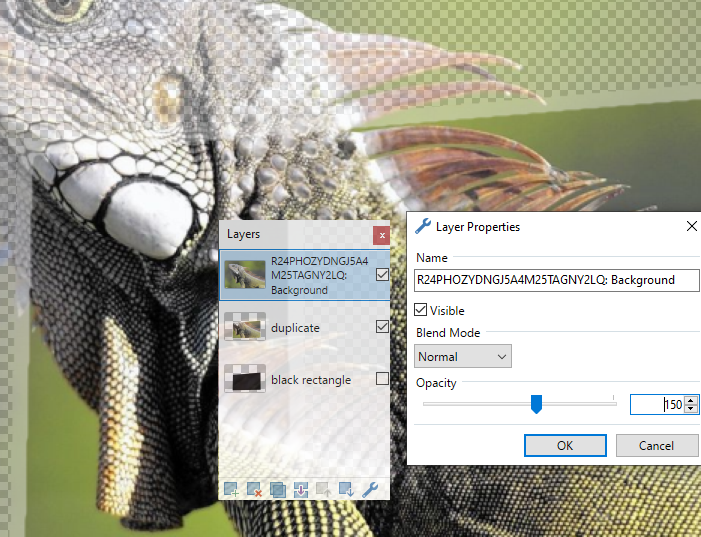
Move the whole picture layer on top of the framed picture layer and then hit F4 and change the opacity to 150. This will allow you to see the framed picture underneath the whole picture to use as a guide.
Then use the lasso tool to select the parts that are out of the picture, making sure that you are going all the way to the picture so that none of the white line shows. You can hold down CTRL and select more than one area - on this I selected the head and the foot.
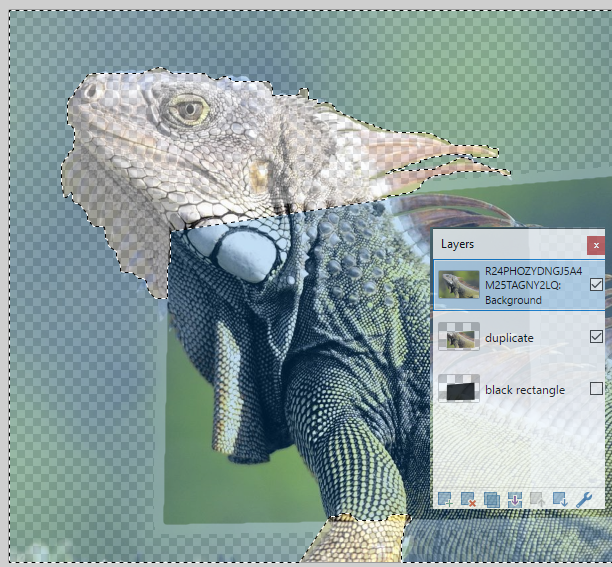
Once you have the sections selected, invert the selection and delete everything else in the top layer. Then go in and change the opacity of the layer back to 255.
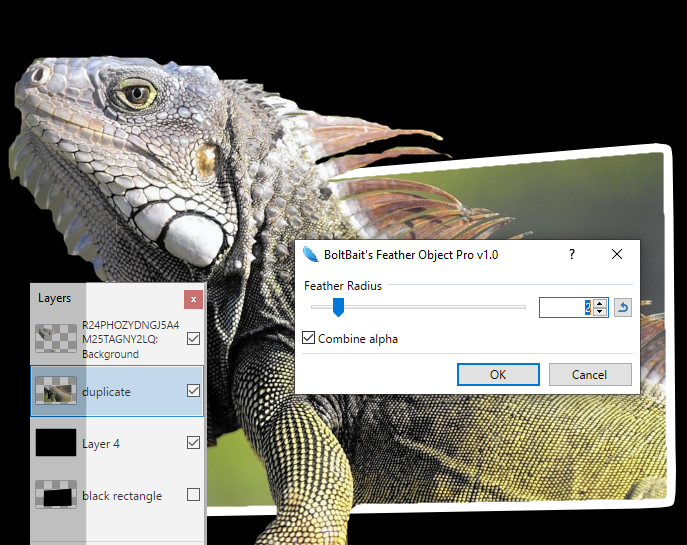
On mine I then flattened out the image and changed the background to black so you could see the white border of the picture better. You can also use @BoltBait's Feather Object on the white frame layer, to smooth it out.
And again, here is the finished product.
Best of luck
Polaroid Collage
in Image and Photo Touch-ups
Posted
I will post a tut for it in the next day or so.