


Hazmaninan-devil
-
Posts
42 -
Joined
-
Last visited
Posts posted by Hazmaninan-devil
-
-

I made the blood using Pyrochild's splatter plugin
-
This could be very great for blood!! Good job ^^
-

This is for a fan comic I'm doing on DA, just part of a necklace with cliched magic symbols. standard issue XD
-
here's mine :

could anyone tell me if theres a tutorial for animations or glowy animations?
This tutorial shows how to use UnFreeze, it's a good freeware that makes simple animated gif
-
how do you make it go faster? at zero it goes medium, at more than 0 it'll go slower. HELP!
Try deleting some repeated or similar frames.
-
Cool effect. Works really well.
Try it with Hieroglyphs as well etc.
On the tut instructions btw, someone -mod or author - edit it so that Median Blur is under Noise not Blurs menu. Noticed that changed in the latest update

EDIT: Sunshine, how'd you do the extra ring with the dividing segments? It's given me an idea.
2nd EDIT: Never mind, my idea was the same as yours ;x And I chucked in 12 arcs and used them as dividers

Oh, thank you. I completely forgot that I haven't changed it. Thanx ^^
-
Thanks for the tut I enjoyed doing something new.

I know theres some pixalization going on but i think thats because of the format i saved it in.
Cool ^^ I love that design in the middle! Yeah, it would look better saved as .png, I suppose.
-
For this one I didn't follow the tut exactly, but--
Very cool tut, I'm really glad I downloaded the plugin :-)
Whoah! Very cool ^^ I love the colours you used!
Woah!Much better than I could do :oops:
Anways, I sorta messed up, because I forgot to get the Zoom plug-in and had to start over

I really like this effect, it's like the whole circle is in motion! Like it's a very intense battle!!
-
Nice tut,
I am new to image making, this is the first one that I have made.
Here was my go by mixing a few other tuts with it. You made it very easy thanks for the time to make the tut for us beginners.

WHoah! That looks epic!
You flatter me too much, I'm a beginner too ^^
-
Cool labels ^^ I love that font! which one is it?
Here's my latest, Hand drawn and coloured in Paint.NET: Aqua & Glacies

-
Happy holidays and Merry Christmas ^^

-
Cool ant, Wither!!

It's supposed to be TV fuzz and someone is appearing from inside the TV a la "The Ring". It's Marluxia again, I use him because he's the only stock pic I have that has a transparent background XD
-
http://paintdotnet.forumer.com/viewtopic.php?f=12&t=21131
Go there to see my latest work.
Any comments?
Some edges are a little rough, but the prinicipal design is very smart ^^.
-
-
This version is very organized when it comes to listing the effects. Good job ^^
-
Cool stuff, eveybody ^^
Here's something I made when I was messing around with the crystalline tut. My bro suggested it looks like a forest, so...

I turned it upside down and added a green tint...or was it a filter? I don't remember :oops:
-
This reminds me so much of Fullmetal Alchemist...
Let me try real quick.

Awesome!!!(For the top zoom, I used Motion blur. I currently don't have that plugin)
COol ^^
-
Cool idea ^^
I never would've thought of that, thank you
-
Nice tutorial and nice outcome 8.8/10
Thank you ^^
http://quenlin.deviantart.com/art/Zodiac-Circle-69063919I kinda went a little crazy.
Cool
Very colourfull ^^ -
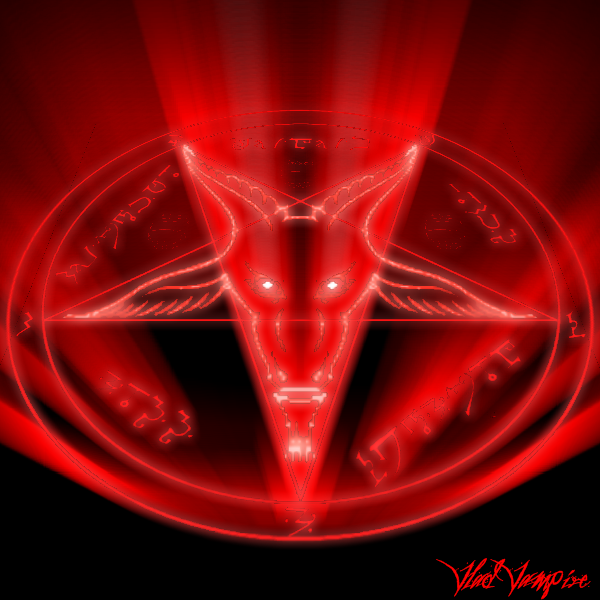
Nice tut! I didn't actually follow it, but I did get the inspiration from it, so here is mine:
http://rubrica.deviantart.com/art/Pentacle-68903695
Click download to view the full size...
Very cool ^^ I love how the different shapes join together in a cohesive structure! Good job
looks like some kind of sacrificial ceremony thing.
those don't but this does Darkshock91
but this cool concept
Man, this is insanely wicked!! *The puns! Oh, the puns!!!*
I reworked it!
Sadly, I forgot to "glow" some of the earlier frames, and I missed a frame somewhere around the 40's. Other than that I like it. Wouldn't have been possible without your tut. Nice work.Wow! Amazing!!!
-
Amazing result.
I tried it, then, using our good friend UnFREEZ, animated it... poorly. Thus activating the magic locked within.

It needs some work, but that's my rough draft of an "activated" magic circle. ... Well, the zoom-blur induced glow would've worked too... whatever. I'll stop rambling now.
O3O
This is so flippin' awesome!!! I gotta try it!!
-
I like the last few steps.
Thank you ^^
I got that idea from an awesome tut in this forum, I don't remember what was it called though :oops:.
this is mine
i had to change the glow on the top layer coz when i did it before it went really dark :shock:
Wow, this is awesome! Good job ^^
Here's my try: You can see that my Glow paramaters changed the outside of the circle.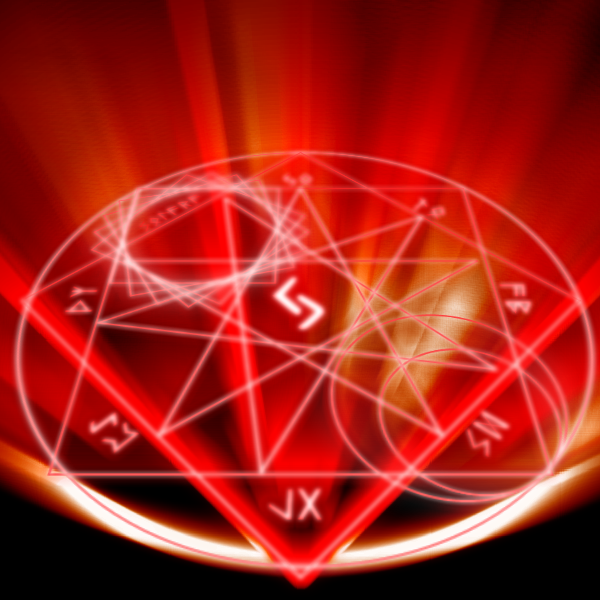
Cool glow
It's like the magic is at the climax of power! Nyahahaha...Sorry 'bout that XD
-
Thank you ^^
Glad you liked it
-
This tutorial is available as a PDF. Click here to view or download it
Moderators Note: Pictures in this tutorial rehosted by ReMake.
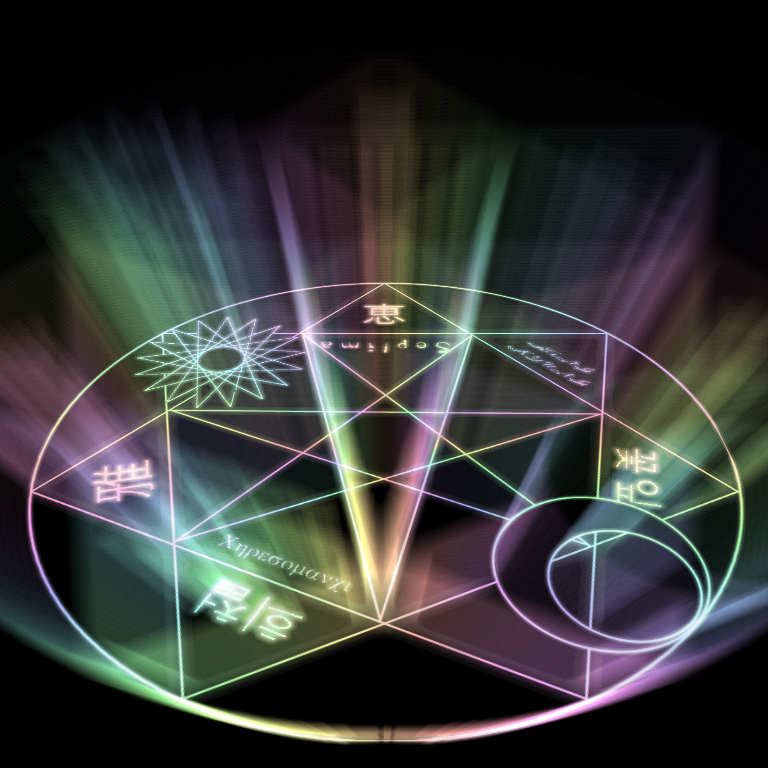
My first Tutorial, please be gentle ^^
First of all, You might wanna have BoltBait Polygon/Stars and Zoom Blur Deluxe plug-ins installed. And also some runic/magical symbols fonts as well, you can find them by just googling "Runic Symbols font". Here's one of the fonts I used (The only one I remember where I got it from)
Anyway, let's get started!
1. It's easier to position the circle if the canvas is a square.
2. Use the bucket to fill the background black.
3. Add new Layer
4. Using the circle-drawing tool, Hold the Shift button and drag the mouse to make a perfect circle.
Alternative 4. Go to "Effects">"Render">"Polygon/Stars...", Max out the vertices. then use radial blur to make it smoother.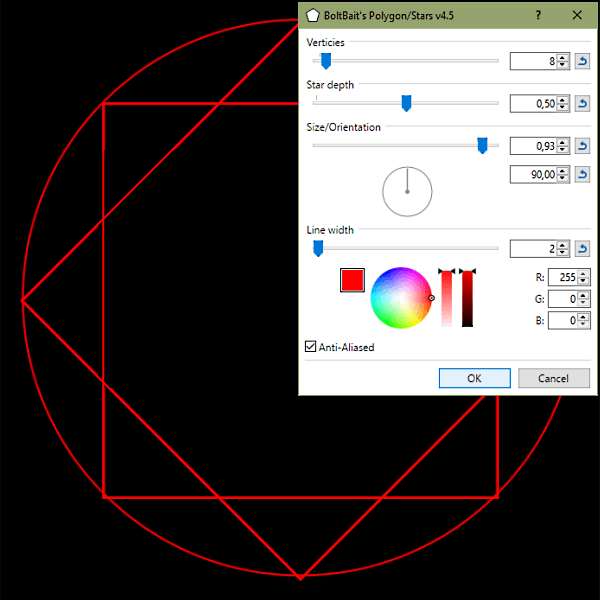
5. Add new layer.
6. Go to "Effects">"Render">"Polygon/Stars...", Don't be concerned with perfectly fitting the polygon/star to the circle right now. Just make sure it's the right size for now, and choose the shape that looks best.
7. Add a new Layer (You don't have to add new ones if you don't want to, I just find it easier to work with.)
8. Create two perfect circles, one inside the other using shift + drag, to create a crescent moon.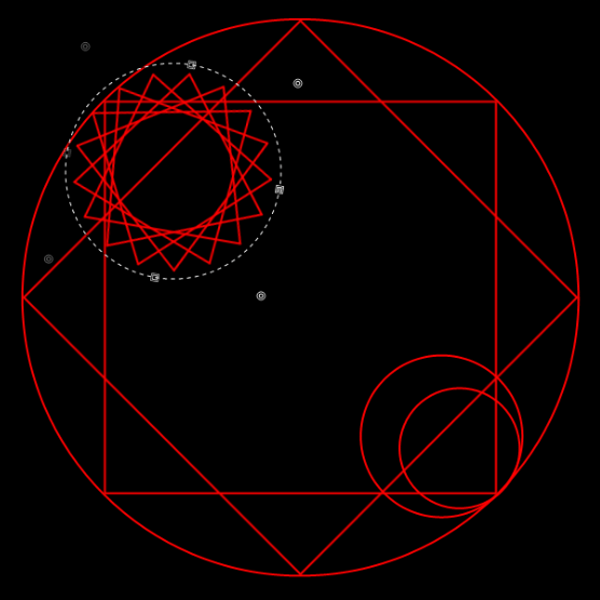
9. I played aroun with the star depth and verticies until I got something close to a sun.
10. Circle-select the "sun" and use the "move selected pixels" tool to drag it to the other side opposite the moon. Rotate it using the right-click mouse drag to rotate and align it to the pattern of the overall circle.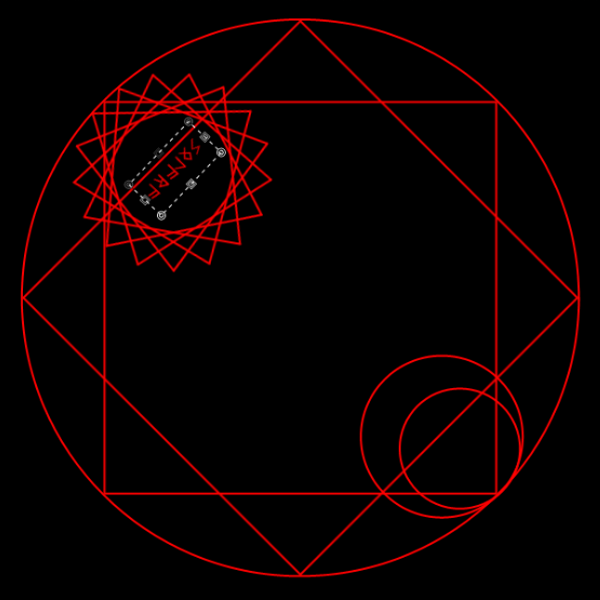
11. Add new layer
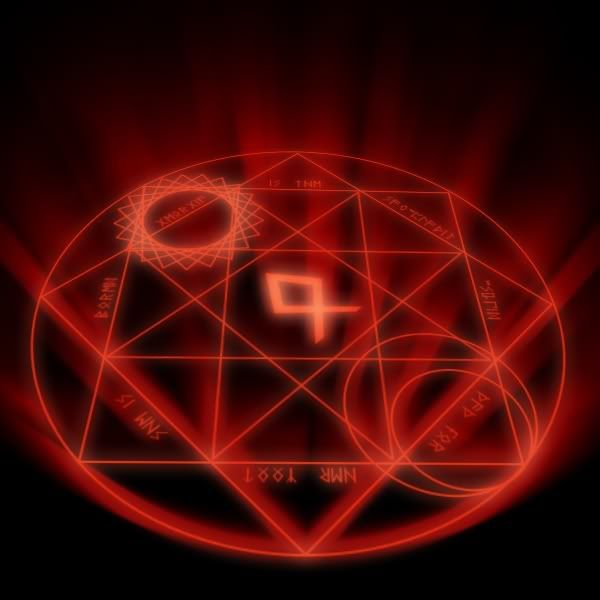
12. Write anything using the runic/magic symbols font, Here I wrote "Solara"
13. Rectangle-select the text, drag, and rotate.
14. That's pretty much the basic patterns, just experiment with different symbols, shapes, stars, and circles.
15. After step 14, you might get something like this.
16. Add some glow to each layer. To make it more fun, try playing around with the glow parameters differently for each layer.
17. Use the "Merge Layer down" button on the history window to flatten all layers except for the black background.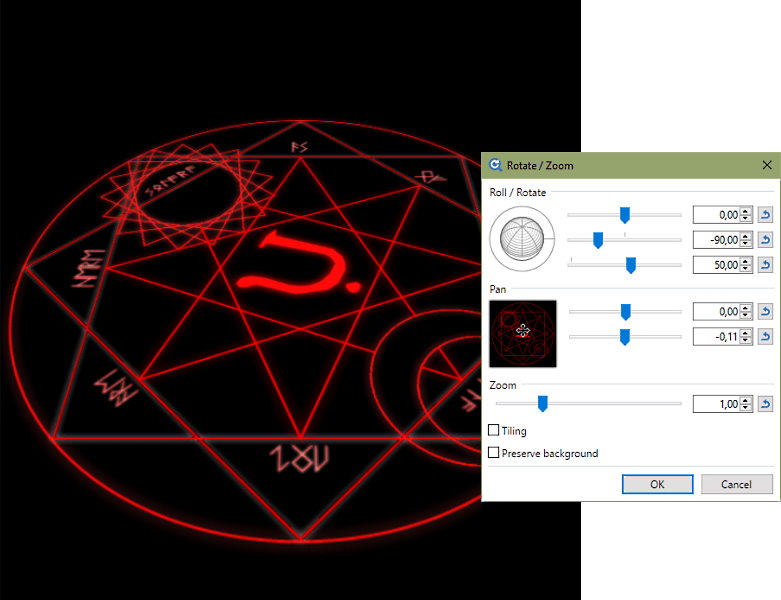
18. Go to Layer>Rotate/Zoom, use the globe or the "twist radius" button-thingy to put the circle at an angle; like it's on the ground.
19. Duplicate layer
20. Go to Effects>noise>Median Blur, and slide on these numbers. (on the bottom layer only!)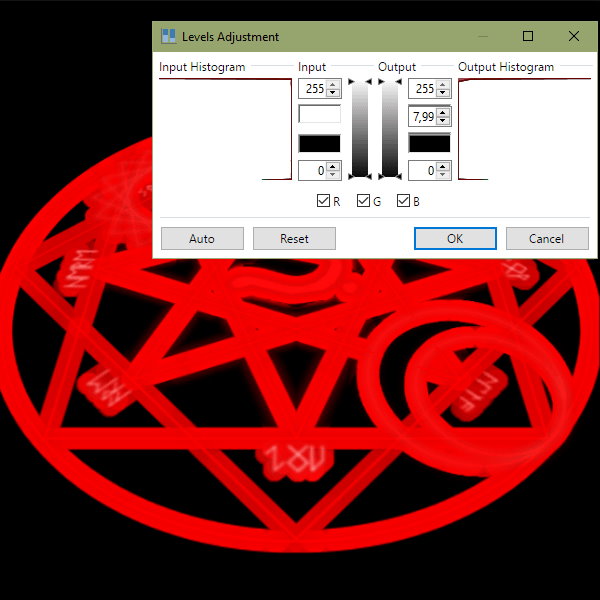
21. Go to Adjustments> Levels and slide the middle output cursor all the way down.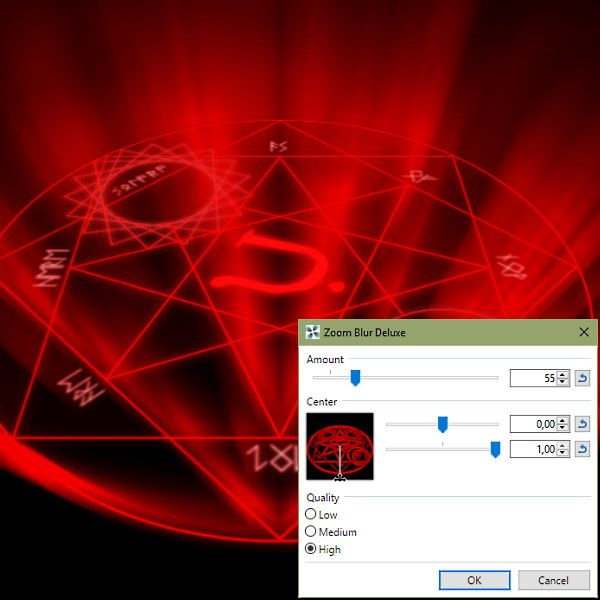
22. Go to Effects>Blur>Zoom Blur Deluxe and give'em one of those ^
hmmm, still something missing...
AHA!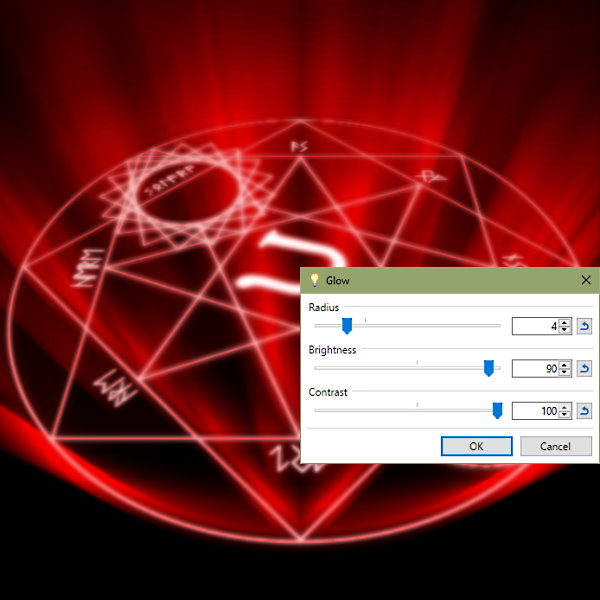
23. Hehe, I almost forgot. Use glow on the top layer thusly.
24. That's it! You should have this \/ as your finished product ^^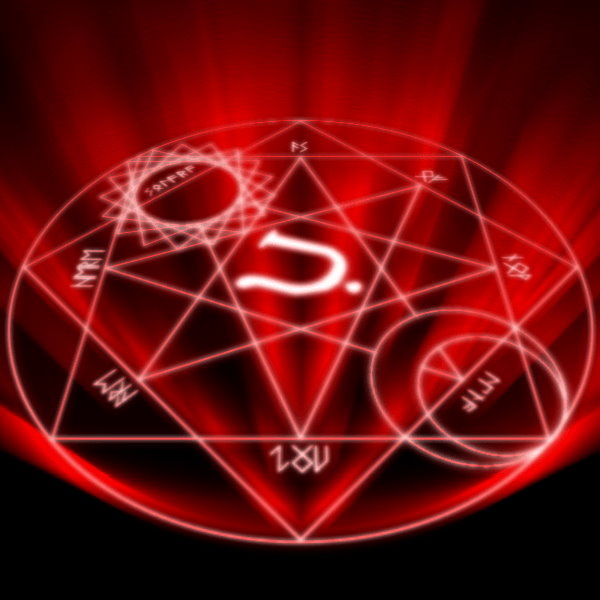
Hope you enjoyed it 😄-
 1
1
-
 1
1
-


Make an Animated .GIF with Paint.NET
in Miscellaneous
Posted
Made this for a project we had in Marketing, it's a mock-up of an ad banner.