


Myrddin
-
Posts
4,053 -
Joined
-
Last visited
-
Days Won
1
Posts posted by Myrddin
-
-
I believe that entirely depends on how you created the fade; you may have introduced another factor into the creation, maybe an underlying white layer or whatever. It is something for you to experiment with, something to enjoy doing. However, I'm not pushing you for that, if you say you're happy, brilliant news! It's been a pleasure to help get you to your goal.
-
[Ah, I had to clear my cache on reload; I wondered why your latest attempt looked unchanged.]
You appear to have got the knack of the technique, so if you're happy, I'm happy. I'm not sure as to why the seams have a white haze to them, but like I said, happy all 'round and all that jazz.
-
Nothing that isn't said in the Comaro tutorial Simon Brown linked to: Gradient tool (
 ); Transparent mode ( :AllColorChannels: > :AlphaChannel: ); draw.
 Layers and overlap are vital for it to work. You may want to adjust, temporarily, the transparency of the layer to be drawn on so you can see where to gradate from and to.
-
As you're creating an object in profile, using effects to mimic three-dimensional features, such as sharpen to make the edges look sharp, may not work as well as intended. In light of the medium, I would (also) suggest attempting to illustrate a metallic appearance; essentially the advice given already:
If your trying to make it look like a razor blade, look at a real razor blade and copy it
Give these results a try:look up some chrome tutorials in the tutorial section
http://www.google.com/cse?cx=0178119197 ... &sa=Search
http://www.sxc.hu/photo/435178
Perhaps creating a background - better than below - would also hint realism:

-
Hello Atradese.
Yes, a little clarification would be very handy, thank you. Perhaps posting a screenshot of another user who has done this.
You should be aware that as a forum for the support of a graphics package, we can't necessarily help you regarding HTML or other some-such coding, or with the technical aspects of another forum - I am not saying nobody will with either of these, however, just that such assistance may not come so readily.
-
So you have each image on its own layer, correct? Overlap the images slightly then apply the transparent gradient.
Something along the lines of:
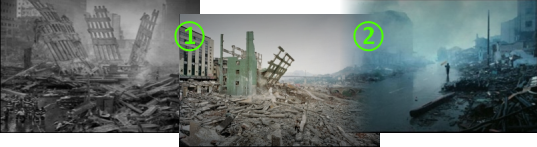
In position (1), the images are overlapped (keep it in line, though, the misalignment is for illustrative purposes); and in position (2) the gradient has been applied.
Is this what you were hoping for?
-
Hello cherrydots18.
How do you mean 'start an image'? Do you mean what techniques can you use to create an image; what tutorials are available; any plugins to help you?
I only ask because there is no need to inform us of your computer model, as Paint.NET, on the whole, works regardless of machine.
If you are asking towards how to use Paint.NET, the best start would be the Help Documents (http://www.getpaint.net/doc/latest/en/index.html) and the Interactive Beginners Guide (viewtopic.php?f=34&t=26971&start=0) to learn the bare basics. From there, the Tutorials section is a good place to learn methods and practices documented by our members, and the Pictorium to see what is possible with Paint.NET.
Please, do elaborate if you require something different from my suggestions.
-
Greetings, Bronzetiger.
To help you further, could you provide two things for us? Firstly, a screenshot to illustrate the deviant behaviour. Secondly, to tell us what version of Paint.NET you are using.
I believe we have encountered this issue before on both the stable v3.36 and the un-stable v3.5 branch.
Thank you very much.
-
Try this to spin your car: viewtopic.php?f=38&t=26976
Remember that Paint.NET is not an animation program by design, you can only create the individual frames in it.
-
Try this to spin your car: viewtopic.php?f=38&t=26976
Remember that Paint.NET is not an animation program by design, you can only create the individual frames in it.
-
Add to that Rule #2. This is better suited to Troubleshooting & Bug Reports.http://paintdotnet.forumer.com/viewtopic.php?f=20&t=3446# 3 and 6 :wink:
Change the tread title please.
I advise that you start a new topic in that section if the following suggestions do not work for you: run the PdnRepair.exe found in the Paint.NET system folder, found in your Program Files; download Paint.NET again from the website and try again.
Moved to Troubleshooting & Bug Reports
Topic locked
-
Hello paulheu.
After a quick search for 'neon', I found a whole host of tutorials for how to manipulate text, or images, to have a neon-esque appearance. You can gander through these results here: http://tinyurl.com/mup9co
Or, very simply, duplicate your text/image layer (Layers > Duplicate Layer), after which you apply a Gaussian Blur (Effects > Blurs > Gaussian Blur) to the bottom layer before colouring it with Curves, Levels, or other suchlike adjustment tool. This relies on the fact that the object with which to be effected has a transparent background, or an area of transparency around it at least.
Jumping back to to searching, there are two search facilities available to you: the built-in Forum Search or the Custom Search Engine. It is highly advisable that you use these before posting again.
I hope something of this helps
 .
. -
Hello paulheu.
After a quick search for 'neon', I found a whole host of tutorials for how to manipulate text, or images, to have a neon-esque appearance. You can gander through these results here: http://tinyurl.com/mup9co
Or, very simply, duplicate your text/image layer (Layers > Duplicate Layer), after which you apply a Gaussian Blur (Effects > Blurs > Gaussian Blur) to the bottom layer before colouring it with Curves, Levels, or other suchlike adjustment tool. This relies on the fact that the object with which to be effected has a transparent background, or an area of transparency around it at least.
Jumping back to to searching, there are two search facilities available to you: the built-in Forum Search or the Custom Search Engine. It is highly advisable that you use these before posting again.
I hope something of this helps
. -
He did, Andrew, for another reason, however, as Simon pointed out.
He did give you an answer, though, ShadowLocke, so why are you asking again? Because you were not satisfied with the lead developer's response? For your benefit, I'll quote Rick's answer to your question:
No idea. There's currently no API for controlling Paint.NET, nor is this supported.As what you are attempting to do is not officially supported - that is, whatever negative ramifications result from your actions cannot and will not be troubleshot - I am going to lock your topic, only as endorsing this further is inviting other, possibly damaging modifications to Paint.NET. Simon pointed out a claim made you that might well be supportive, but on the whole, I cannot let this discussion continue with the other things in mind.
This doesn't stop you from trying to launch Paint.NET from another application, only asking about it here.
Topic locked
EDITED: the odd sentence that needed to be written.
-
jps4141, you should be aware that using [rule=4]legible English[/rule] is a must, as this will make you as understandable as possible to as many people as possible - therefore helping you quicker. That is not to say 'perfect' English, we do not expect that of anyone, nor show preferential treatment to those who do. Just a little bit of regard to how you write will go a long way, and be more courteous to the large number of non-native English speakers on the Forum.
You can see already that the first two replies were effectively 'wasted' because a grasp of your request could not be made.
This will do nicely, more-or-less:
hey, I'm new here and I need to know how to make a kickin' font or style like "ForgottenGenesis" - that's common screen name. I just made the background but I have no idea how to put the "Forgotten Genesis" in the middle. Is there soome tutorials? Please links tnxYou will require a plugin called 'Align Object'. You can find this in the Plugins section. This will allow you to precisely centre the text (which should be on its own layer) on your background.
Alternatively, typing the text, again on its own layer, and highlighting it with any of the selection tools will allow you to use the Move Pixels tool (
 ) to move the object around freely.
---
Please be more aware next time of your language.
-
jps4141, you should be aware that using [rule=4]legible English[/rule] is a must, as this will make you as understandable as possible to as many people as possible - therefore helping you quicker. That is not to say 'perfect' English, we do not expect that of anyone, nor show preferential treatment to those who do. Just a little bit of regard to how you write will go a long way, and be more courteous to the large number of non-native English speakers on the Forum.
You can see already that the first two replies were effectively 'wasted' because a grasp of your request could not be made.
This will do nicely, more-or-less:
hey, I'm new here and I need to know how to make a kickin' font or style like "ForgottenGenesis" - that's common screen name. I just made the background but I have no idea how to put the "Forgotten Genesis" in the middle. Is there soome tutorials? Please links tnxYou will require a plugin called 'Align Object'. You can find this in the Plugins section. This will allow you to precisely centre the text (which should be on its own layer) on your background.
Alternatively, typing the text, again on its own layer, and highlighting it with any of the selection tools will allow you to use the Move Pixels tool (
) to move the object around freely.---
Please be more aware next time of your language.
-
Hello there, flarn2006.
Many times: http://tinyurl.com/m6dfwqI don't know if anyone has suggested this before...So far and for the foreseeable future, you will not see such a tool in Paint.NET.
You can, on the flip side, follow the Frosted Glass or Clone Stamp suggestions put forth in the topics linked to above, or you can try the Custom Brushes Mini plugin, where you can 'airbrush' more fluidly and with a brush that will suit you better. There are two versions of Custom Brushes, the better, newer version being located here: viewtopic.php?f=16&t=30118
I hope this answers you somewhat. I also hope you will [rule=1]search first[/rule] (with the built-in Forum Search or the Custom Search Engine).
-
Image menu > Resize Canvas. From this dialog you will need to enter in a larger value in the height field that will accommodate your required text. Next, choose the anchor position top (you will notice the graphic arrows now point downwards) as this will ensure that the additional canvas will land on the bottom, rather than elsewhere.How can I get this space under image for text?If your image/template needs to conform to a certain height-size, the one you have currently, downsize the image first then resize the canvas as detailed above. You can resize the image from Image > Resize.
That is something you need to consult the Ecover Engine's help material for; we cannot be expected to assist with every other product as well as this one. I'm sorry.How can I import my edited image from my desktop within my Ecover Engine on my chosen template?Are there any forums or help documents you can browse? These would be the best places to start.
Howdy.Next mod will for sure lock this thread. -
Image menu > Resize Canvas. From this dialog you will need to enter in a larger value in the height field that will accommodate your required text. Next, choose the anchor position top (you will notice the graphic arrows now point downwards) as this will ensure that the additional canvas will land on the bottom, rather than elsewhere.How can I get this space under image for text?If your image/template needs to conform to a certain height-size, the one you have currently, downsize the image first then resize the canvas as detailed above. You can resize the image from Image > Resize.
That is something you need to consult the Ecover Engine's help material for; we cannot be expected to assist with every other product as well as this one. I'm sorry.How can I import my edited image from my desktop within my Ecover Engine on my chosen template?Are there any forums or help documents you can browse? These would be the best places to start.
Howdy.Next mod will for sure lock this thread.
 ); Transparent mode ( :AllColorChannels: > :AlphaChannel: ); draw.
 ) to move the object around freely.
Help to do something with paint.net
in Paint.NET Discussion and Questions
Posted
Hello lubicdj.
I hope this doesn't sound sharp, my aim is to explain this in the best possible way in light of your weak English.
For 'blur/fusion' there is a plugin called 'Feather' that will do just that. You can find this plugin in the user BoltBait's plugin pack: viewtopic.php?f=16&t=26238 (BoltBait is a speedy fox with his replying.)
If you are unsure how to install plugins, check here: viewtopic.php?t=2023
You must make sure that you have your pizza on its own layer before using the plugin. You can use any of the selection tools (http://www.getpaint.net/doc/latest/en/S ... Tools.html) to highlight the pizza and copy-and-paste it to a new layer (the Edit menu will have these options). The commands may not differ much from iPhoto Express.
For the transparency of the pizza, you can adjust the transparency of the pizza layer (created for feathering above) by going to Layers menu > Layer Properties, and adjusting the 'Opacity' slider. Or, you can click the Layer Properties icon on the Layer window (http://www.getpaint.net/doc/latest/en/LayersWindow.html).
Does this help you?
The Help documents are a great source of information if you ever become unsure about how to do something (Help menu > Help Topics). Also, Search may answer some questions as well (http://www.searchpaint.net).