


Down
-
Posts
457 -
Joined
-
Last visited
Posts posted by Down
-
-
-
Hmm, mine works fine.
Try....Wait, read this:
Hidden Content:Person A: How do I do ______ ?Person B: Oh just click on _____ and then do _____
Person A: I can't find it :'( :'(
Person B: Well make you sure you look over ______ and click on _____ first
Person A: I still can't find it!!! :'(
Person B: (suddenly gains psychic insight) Oh, make sure you have the latest version installed.
Person A: (suddenly gains the power of the latest version) Yes! IT works now!
If different, redownload it.
-
You should always save your changed image as a different one from the original, unless your absolutely sure of what you're doing.
Did you overwrite the original?
-
Heh, Instant lockdown thread.
It's a common issue.
This kind gent has a link in his signature: memberlist.php?mode=viewprofile&u=4114
-
Oh yeah, that works pretty good.
-
...Wait, you made the prince in pdn??
/jk =p
Fantastic job, v1 is the best.
-
In the image resizing options there is a resolution setting you can change.
-
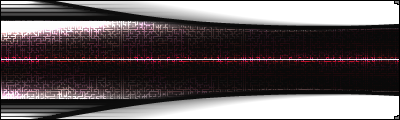
Looks like a gradient blended into a patch of some zoom blur'd noise.
-
Very cool. Looks like multiple layers of an angled gradient with twist and blend modes.
Shouldn't be too hard to recreate.

~<3
-
Looks decent.
It's creepin me out... :shock:
-
Ctrl+Shift+Z works well too.
-
Yeah...I would ♥ to have pdn in the concept skin Helio made.
-
Do NOT use the whole Adjustments way to lighten the white part.Oh. I just looked at the tutorial link you posted, so I misunderstood exactly what you were asking.
^^
Yeah...
-
The edges looks good.
-
Yeah, I used an ellipse
 shape, but still a linear gradient.

Same method. Glossier, no?
-
Impressive stuff. All I ever made was 1/2 of a polygonal elephant in Maya....and some kickass vases.
-=-
•Make your basic button shape on the 1st layer.
•Add a new layer, for gloss.
•On this layer use any of these:


 in white, to draw a shape over your button in the area you want your gloss to be and delete the parts you don't need.
•Select the gradient tool and click the color channel :AllColorChannels: button so it changes to :AlphaChannel: alpha channel.
•Draw your gradient to fade the white.

Obviously cropped down.(but still gigantic)
You may have to fix the edges of your gloss...I just Gaussian Blurred it, but it doesn't give it that 'sharp' look.
-
:LassoTool:

 + delete.
 -
Oh. I just looked at the tutorial link you posted, so I misunderstood exactly what you were asking.
...Well, you could have one of your colors set to transparent and the other white...Then make a new layer and add your linear white gradient and use the selection to cut it off where you want, or you could draw an opaque, white shape and use the transparency gradient as mentioned in the tutorial.
Your gloss shape should be on a new layer.
-
•Adjustments>Curves - Set the points above the median line till it looks right.
-
Looks amazing before it twists.

I call this: Scribble, crystalize, blur and blend over small gradient bars.
-
Just use that picture, select everything inside the border and delete it.
Then save the border so you can apply it to as many pictures you like.
If you want different sizes, just use the square rectangle and touch-up the corners with the pencil.
-
Select parts and delete them with the delete key.
The tutorial has a very easy and good method for this.
It will work.
After your image has been 'rendered' your may have to fix the edges with the feather plugin.
Gl!
-
Nice!
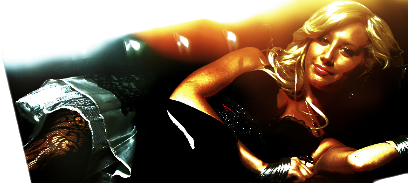
Carnage tag, as seen below.
-
Very cool despite the :AntiAliasingOff:
VIt is now a black hole.V
 shape, but still a linear gradient.


 + delete.
splatter.dll
in Paint.NET Discussion and Questions
Posted
Heh, np.
Forgive me if the tone offended you MT, just putting it out there.