


david.atwell
-
Posts
11,615 -
Joined
-
Last visited
-
Days Won
20
Posts posted by david.atwell
-
-
I am very aware of the sensitive nature of my question, and wont be posting any images. I think we all know what is being discussed, so I'm trying to be discreet.
I'll try that bevel plugin, thank you. I really thought creating this adult themed comic would be easier than this. I appreciate your help.
I understand, thank you. I just wanted to head off any issues before they occurred.
-
Split out offtopic discussion to http://forums.getpaint.net/index.php?/topic/107639-metric-vs-imperial-life-vs-science/ .
-
You are of course welcome to seek help here, but please do keep Rule #12 in mind while posting and post generally (not specifically) or create family-safe images to display any concepts you need to get across. Thank you!
-
There is only one developer; his name is Rick Brewster, and he reads this forum. By posting here you have already contacted him.david.atwell , I have 7,000 resized textures (No need to change the size). Need apply AA's_Assistant effect to all files. And maybe other effects as in Paint.NET.
How to contact with developers Paint.NET?

-
 1
1
-
-
I have 7,000 textures resized. (x4 larger than source ) [RGBA]
Need to smooth all edges, etc. (Antialias[AA's_Assistant],Smooth,...)
Unable to add batch files processing to the Paint.NET or developer of Paint.NET thinks that it is required to nobody?
(Sorry if the translation GoogleTranslate is bad.
 )
)You can use IrfanView to do the resizing. I am not sure if there is a way to use that program to smooth the edges or not.
It hasn't been added to Paint.NET natively because it's not a priority for the developer. Not that he doesn't think anyone will need it, but (I think) because it doesn't fit with his vision for the program.
-
Paint.NET does not have native support for batch processing. There was a plugin available, but it hasn't been updated for 4.0.
What effect do you need to apply? You might try IrfanView, which does do batch processing.
-
Moving to Troubleshooting. PdN 4.0.9 works fine on Windows 10; people in the Troubleshooting forum should be able to help you out.
-
You can keep the@david.atwell.....I am honored that you pinned this!
 Thank you so much...it means a lot to me.
 or
or 
 (My first pin!), but I'll happily take the , , and .
Well done, though. Seriously, keep this up and it definitely won't be your last.
-
1
-
-
Pinned. This is one of the best results I've seen in ages.
-
2
-
-
Tons of new features, and more coming soon.
Plus, we can't provide any support on the forum for older versions of the program.
-
The error message mentions Direct2D, which uses DirectX. Perhaps one of those "pirated" video games in your downloads folder had something in them that corrupted your DirectX.
Those look like guides, not pirated games, Toe.
-
All right, everybody. Let's stay on topic here.
-
If you're installing on Google Chrome, the download manager should show you a button at the bottom-left of the screen that says "paint.net.4.0.9.install.zip". Click the arrow on the right of that button and hit "Show in folder". It will open the folder it's been saved to and highlight the ZIP file.
-
You can upload images to the forum by clicking the "More Reply Options" button below, then attaching a file using the "Choose File" button. :-)
-
It would probably look better flickering.
Gonna give people a seizure like that!
 Maybe try a 4-frame animation: 100%, 75%, 50%, 75% transparency. Much easier on the eyes.
 -
MJW earns his second spot with this great tutorial on making a Star Wars hologram effect! Check it out, Obi-Wan Kenobi. You're my only hope.
-
Mini-Tut #14
Star Wars Hologram Effect
by MJW, in response to PhantomFury
Original thread: Star Wars Hologram Filter
Original post: 512506
On 2/18/2016 at 0:32 AM, MJW said:End result:

1. To get the lines, I used Ed Harvey's Stylize>Halftone plugin with the following settings:- Shape set to Line Centered
- Size set to 4
- Angle set to 0
- Contrast and Brightness adjusted to get a relative clear, detailed image
3. I followed this with a Photo>Glow.
The color's overly blue, but I'll explain the basic idea anyway.
1. After erasing the photo's background, I duplicated the image.
2. On the top layer, I used the Halftone and Gaussian Blur method just described, with the Secondary color set to bluish. The lower layer was disabled.
3. I then set the top layer's blend mode to multiply and enabled the lower layer.
4. I adjusted the lower layer's saturation to get a bluish cast with some color (I could have used more color).
5. I merged the layers, then applied the Glow. -
Full disclosure: I work for one of SAP's competitors. But is using that program a requirement? Is there not a web-based application that you can use?
-
Truly a baffling paradox.(empty comment to show that I'm listening to this thread)
-
1
-
-
Lucky number 13! Cc4FH has a great roundup of clean cutouts. Essential tutorial!
This clears out the backlog, as far as I can see! Please keep submitting mini-tuts to add! Thank you!Exclamation points!!!!!
-
1
-
-
Mini-Tut #13
Clean Cutouts
by Cc4FuzzyHuggles, in response to Carrito
Original thread: Change the background step by step to a portrait
Original post: 434564
How to change the background of a portrait?
Add a Layer.
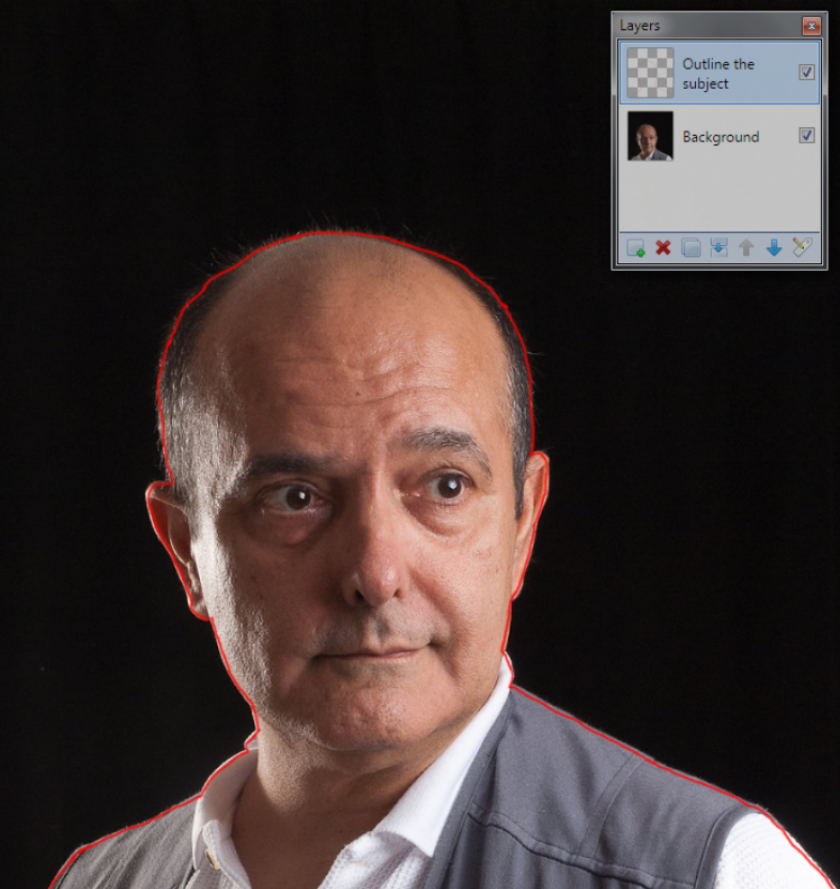
1) Add a new layer above your image's layer. This will be your outline layer.
Look at this picture's layer window. It shows you the background layer is your image layer, it shows you a new layer has been added above the background layer, and that the added layer is the outline layer. While tracing, the outline layer is the active layer.
http://img110.xooimage.com/files/4/4/5/hairline-01-4d7601a.png
2) Trace your subject. How to trace?
3) Be sure you are tracing on the correct layer, your outline layer.
In this screen capture, it looks like the tracing might have accidentally been done on the wrong layer. (Look at the layers window. The outline layer is not the active layer.)
In one of the attempts to make a selection, it looks like the magic wand was also used on the wrong layer. (Again, look at the layers window. The outline layer is not the active layer. When you get to the magic wand step, you need to use the wand on the outline layer.)
http://oi68.tinypic.com/2gydjjr.jpg
It is very important to make sure you are on the correct layer while trying to do the steps of removing a background.
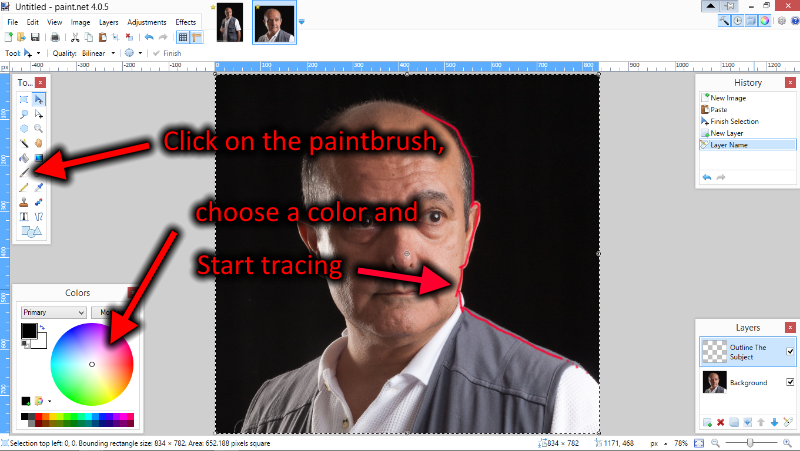
4) Continuing with how to trace...
-- You can use the paintbrush tool for freehand tracing, or use the line/curve
 tool as an alternative tool if you aren't very good at freehand tracing.
-- Then Pick a color.
-- Then start tracing.
http://img110.xooimage.com/files/2/f/d/hairline-tracing-4d7a3a3.png
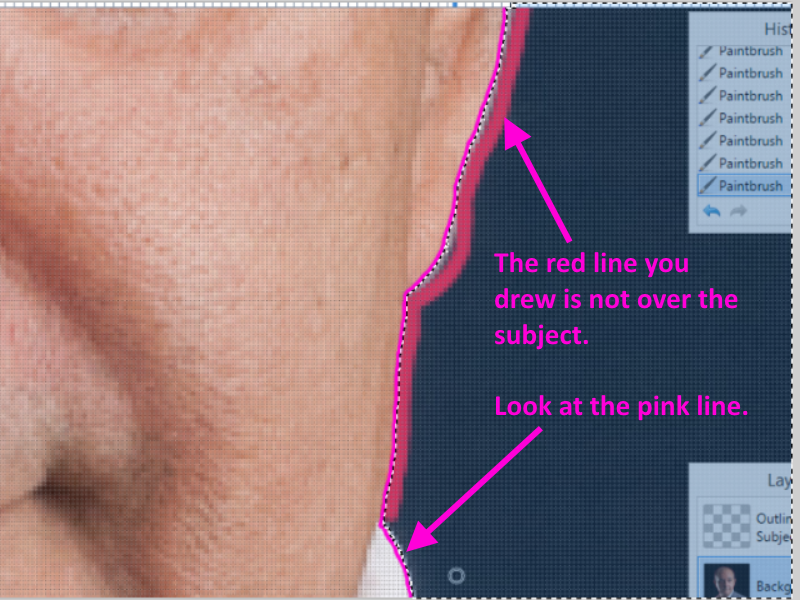
5) When you trace, trace on the inside of your subject.
http://img110.xooimage.com/files/4/4/8/hairline-04-4d7ba9e.png
6) Use a variety of brush widths.
This picture wasn't originally used to demonstrate outlining, so ignore the removed background and which layer is the active layer, the outline is still on the outline layer and the outline layer should be your active layer when you are tracing.
Anyways, my point here is I want you to look at the outline. An outline doesn't need to be super small or thin, it can be almost any width. Just make sure you keep your outline on the inside of your subject. In this picture a variety of brush widths were used and the subject was painted over. The outline layer's opacity was also lowered a little, so that the subject, and where to trace and paint, were easier to see. (To lower the outline layer's opacity, double click the outline layer to open it's layer properties.)
http://s5.postimg.org/ns7dp405z/0294948b_f976_47a5_9eaf_c07b1fb3f5a6_zpsmbsyu2r3.jpg
7) Finish outlining your subject. Be sure it is a completed outline, no gaps or thin spots.
8) Make a selection.
9) To make a selection, first choose the Magic Wand tool
 .
.10) Lower the Magic Wand tool's tolerance.
11) Be sure you are on the outline layer, then click on the outside of the outline.
12) If your outline doesn't protect your subject, and things you don't want selected become selected, then try these ideas :
Try lowing the tolerance of the magic wand, then try selecting again, and see if that helps. (try a tolerance anywhere from 0 to 15)
If you still have an issue, your outline might have a gap or thin spot somewhere.
To find the gap or thin spot,
-- Temporarily add a new layer below your outline layer.
-- Fill the new layer with a color that helps your outline be easy to see.
-- Then zoom in super close and look around your outline to see where it might not be connected or might be too thin. (note: Sometimes outlines aren't finished near the edges of the canvas.)
-- Fix your outline in any potentially poorly outlined areas. (when you fix your outline, be sure you are on your outline layer)
13) Once you have a successful selection, keep your selection on, and then click on the image layer.
14) You can remove the background by either simply hitting delete on your keyboard (this will cut off some details like hair), or you can use a plugin that removes color (this is a good idea for subjects with hair or fur).
15) For this particular subject, the Replace Colors plugin was used.
For most color replacing plugins, you can use the color picker tool to first pick the color you want removed, and then run the plugin.
This is a quick and rough example of removing the background with the Replace Colors plugin. Look at the settings to see what was adjusted.
The "Effected Color" was a shade of black.
The "New Color Transparency" is set to 255.
The "tolerance" is set to 23.

Larger version of the image :
http://s5.postimg.org/524dbdwwn/Person_Subject_Replace_Color_Plugin.jpg
16) If the plugin doesn't remove everything, you can use the color picker tool again on the leftover spots, then run the plugin again. (reset the "effected color" by clicking the blue arrow button.)
17) If there are still some spots of the background, use the eraser tool
 to erase and clean up any remaining background that the plugin didn't manage to remove.
18) After you remove the background, you can deselect and try running the feather plugin to soften the edges of the subject.
Congratulations! You have removed the background from your image and cut out your subject.
19) Add a new background.
Add a new layer under your subject's layer, and insert your new background.
Your layers would be like this:
Outline Layer.
Subject Layer.
Background Image Layer.
I'm not able to give screen captures of adding a new background at this time. If someone else would like to finish things off by going into details about adding a new background, then that would be nice.
20) Turn off the layers you don't want or need. And then save your image. Save as a pdn to keep your layers, then save again as a png.
EDIT...
For anyone else who reads this, alternatives to step 19 for different ways to add a new background, can be viewed in these posts :
-
1
-
-
-
Mini-Tut #12
Clear Text Overlay
by MJW, in response to Mac123
Original thread: Text
Original post: 426406
On 5/11/2015 at 4:56 PM, MJW said:- Start with the image you want to use.
- Add an new layer (name it Text). (It will currently be the topmost layer.)
- Set the Primary Color to white. (If the Primary and Secondary colors are currently black and white, just switch them.)
- Using the Text tool, type in the desired text. (It will be white on a transparent background.)
- Duplicate the Text layer (name the new layer Shadow). (The Shadow layer will now be the topmost layer.)
- Set the Primary Color to black.
- Run the Drop Shadow plugin on the Shadow layer.
- Set the Blend Mode of the Shadow layer to one of the darkening Modes, such as Darken or Color Burn. (Darken in my example.)
- Adjust the Shadow layer Opacity to give the best look (214 in my example).
- Set the Blend Mode of the Text layer to one of the lightening modes, such as Lighten or Color Dodge. (Color Dodge in my example.)
- Adjust the Text layer Opacity to give the best look (60 in my example).
- You can then Flatten the image.
For the Drop Shadow, I used an X and Y offset of 2, a Widening Radius of 1, a Blur Radius of 3. The values will depend on the image size and the desired effect.
Make sure the "Keep original image" option is selected.
The order of the steps can be changed. You might want to add the drop shadow last so its effect can be more clearly seen and adjusted. You can also use the Drop Shadow's Shadow Opacity control instead of changing the Shadow layer's Opacity, though it gives a bit less flexibility.
Example:
-

 )
)
 or
or 
 (My first pin!)
 tool as an alternative tool if you aren't very good at freehand tracing.
 .
. to erase and clean up any remaining background that the plugin didn't manage to remove.
Error 1603
in Troubleshooting & Bug Reports
Posted
Sorry to hear about that. Have you tried everything in this post?
http://forums.getpaint.net/index.php?/topic/18931-fatal-installation-error-1603-fix/
And this one?
http://forums.getpaint.net/index.php?/topic/30437-win7-error-1603-32-bit-msi-may-not-be-installed-on-64-bit-os/
And this one?
http://forums.getpaint.net/index.php?/topic/692-install-update-or-uninstall-trouble-read-this/?p=397416