


Tanel
-
Posts
205 -
Joined
-
Last visited
-
Days Won
3
Posts posted by Tanel
-
-
-
Paint.net is not appropriate program for this, use IrfanView instead.
See this batch conversion tutorial for example.
-
I think here is exactly what you're looking for:
viewtopic.php?f=12&t=5513#p57490
This method works on all shapes.
Only update is that "Gaussian Blur Channel" plugin is now called GaussianBlur+ (available in BoltBait's plugin pack).
-
I bet you get it most easily done with Conditional Hue/Saturation plugin.
-
how come I never got to know these plugins...
Because both are so grey? :wink:
-
Hello All,
I have an image of a locomotive for MS Train Simulator that I want to convert from blue to red. I thought that this plugin would be perfect for this job, but I have not found a way to precisely control the result I am looking for. The main part of the image has a HSV of 203-85-63 and I want that converted to HSV 343-100-73.
It does a very good job converting all the colors and I can get my main color close, but I can't hit it precisely or consistently. I notice that the color picker in PdN uses HSV format, but this plugin uses HSL. I am assuming that this is throwing me off because the color picker H range is 0-360, S range is 0-100, and V range is 0-100. The plugin H range is -180 to 180, the S range is 0-200, and L range is -100 to 100.Ted
You have wrong understanding of this plugin. Use Conditions panel to define which color you want to change (Conditions panel = color wheel and 4 sliders beneath it). Then in Action panels you define the nature of changes to be performed on your selected color range. There are + and - ranges in Action panels because by editing you can either increase or decrease those parameters.
If it still doesn't serve you well enough, you could alternatively try "Color to Alpha" plugin to separate your object from backround.
-
2nd pic - Advanced Greyscale plugin: R 100, G 50, B 0
:?: what plugin is that i searched and found nothing... :? :shock:
Actually I meant Illnab1024's "Channel Mixer Greyscale". In effects menu it's called Advanced Greyscale.
I don't use the one advised by Javert.
-
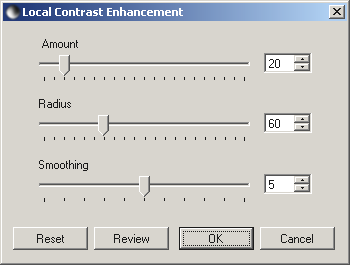
This plugin (LCE for short) allows to clarify flat or hazy looking photos. It also adds depth or three-dimensional look sometimes. For most of photos you won't need it, but sometimes it's very useful: for distant landscapes or clouds for example. By default the effect is very subtle - to provide enhanced, but still natural looking result.
Menu location: Effects > Photo.
Download as part of my plugin pack.
Updated to version 1.2 (2008-12-24)!
Changes: few UI and code optimizations.
Updated to version 1.1 (2008-08-31)!
- Compatibility fix for paint.net 3.36
Controls:
Amount - percentage of contrast to be added
Radius - width of contrast detection area
Smoothing - reduces the effect gradually at extreme shadows and highlights, to avoid overprocessed look or color clipping.
Amount 10-30 should be sufficient for natural result.
Radius should be chosen according to image size. There is no rule here but generally: the larger the image, the greater radius you may need. 60 is about optimal for screen size image. 90 or more for large (>3MP) images. 30 for web size images.
Smoothing at default setting 5 prevents color clipping in extreme shadows and highlights. Increasing it mutes the effect in shadows and highlights even further. Reducing to zero turns shadows/highlights preserving off.
Notes:
Similar effect was possible with Sharpen+ plugin, but this one is specially configured for contrast enhancement and is twice faster.
Contrast is applied to pixel's brightness only, preserving original hue and saturation.
Try also special contrast effects: with several (3-4) passes at reducing radius and growing amount (for example Amount/Radius: 10/60->20/30->30/10).
Below are some links to tutorials describing the LCE technique using Photoshop's Unsharp Mask.
This plugin does the same, but avoids color shift and clipping problems noted in those pages.
<!-- m -->http://www.cambridgeincolour.com/tutori ... cement.htm<!-- m -->
<!-- m -->http://www.earthboundlight.com/phototip ... -mask.html<!-- m -->
<!-- m -->http://www.luminous-landscape.com/tutor ... ment.shtml<!-- m -->
<!-- m -->http://www.lonestardigital.com/photoshop_quicktips.htm<!-- m -->
(note: radius 50 in Photoshop is about equal to radius 100 in Paint.NET)
Samples:
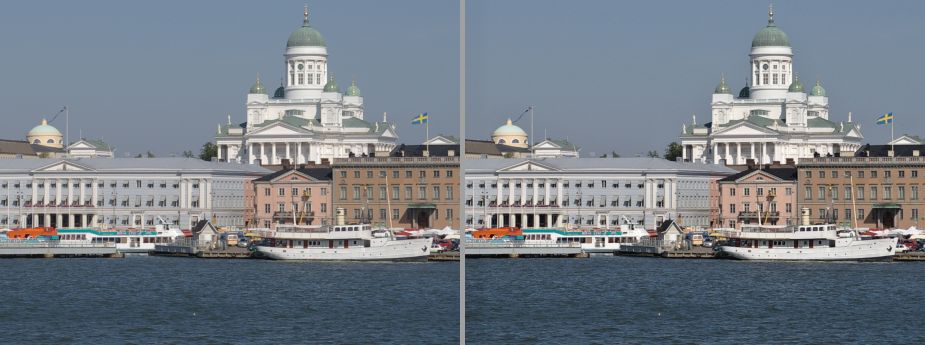 1st pic - original
2nd pic - LCE, defaults
Resized to 40% for web sample.

1st pic - original
2nd pic - Advanced Greyscale plugin: R 100, G 50, B 0
3rd pic - LCE, 4 passes: Amount/Radius 10/60->20/30->30/10->40/5 (Smoothing always 5).
Resized to 33% for web sample.
Remember the look of good old b/w photos?
Enjoy! 😎
-
I would like this plugin, however, every time I click on the link I get the following error message:
Microsoft IE execute shell has experienced an error and must shut down. Please help.
Try right click + "save target as..." instead.
-
Cool, especially the Selective Palette.

Just an observation:
Jumble renders some blocks pixelated (aliased) if image width or height doesn't divide exactly by number of blocks.
For example 4x4 blocks on 725x497 image. Not critical but maybe you want to fix this.
-
I have rewritten this effect from scratch. The effect now shows up in the Effects > Object submenu.
It now includes a third slider to control the strength of the effect:

Suggestion: please rename the Amount control to "Radius" or "Width" to be more intuitive.
I think words Amount and Strength have too similar meaning and this is confusing for occasional users.
-
Hi,
I have made few improvements, please upgrade!
Download link in 1st post.
Changes in v2:
1) Effect is now located in Adjustments menu.
2) Fixed a bug caused by PDN's Gaussian Blur misbehaviour. Semitransparent areas are now feathered correctly.
3) Added check box "Override Original Alpha". This controls how to handle originally transparent/semitransparent pixels:
- unchecked (default) -> transparent pixels remain transparent, even if pixel's color match your selected color.
- checked -> transparent pixels turn opaque if pixel's color match your selected color.
This is useful if a layer contains erased areas: you can decide wheter to keep those intact or not.
BTW, note that Feather, Base Opacity and Invert Alpha can be also used independently from color controls (with unchecked Hue/Sat/Brigh); so you may find alternative uses:
- Feather (without mishandling semitransparent areas -> bug in current Feather and Gaussian Blur Channel effects)
- Base Opacity to "un-erase" erased areas
- Invert Alpha to invert opacity
-
The simpliest way is to use Curves+ plugin.
Choose Advanced mode, in: Red, out: Alpha.
Default curve shape (straight line from bottom left to top right) represents 1:1 conversion from red to alpha as you described (R255->A255). You may want to bend the curve to adjust the effect. Reversed curve (top left to bottom right) converts in opposite direction (R255->A0).
Color to Alpha plugin may be too difficult to set up for that task. Thanks for publicity, though. :wink:
-
I'm going to keep current UI at this point.
Though I agree it's not easy for beginners.
-
Check this out, linked screenshots show what happened to 200x200 image (zoomed in 4x):
Apparently 180 degrees rotated image is placed into coordinates 1;1 instead of 0;0 (gap appears on left and top edge);
90 degrees rotated image is placed into coordinates 0;1 instead of 0;0 (gap appears on top edge);
-90 degrees rotated image is placed into coordinates 1;0 instead of 0;0 (gap appears on left edge).
-
Yes it is, here: http://www.evanolds.com/pdnhs.htmlI don't think Conditional Hue and Saturation's source was released.But it is still quite over my head. :?
-
I'm a fan of that color wheel - angle control too, but this is Evan's own creation and I don't want to rip off his code.just a thing what about an UI like the Conditional Hue\Saturation?you know with the color wheel to show the range..
I tend to agree on Adjustments menu, seems to be more relevant than Effects. I will change it together with other possible fixes in a week or so.oh yeah and Adjustments menu too, if you don't mind... -
Can you put it in either
Effects->Adjustment ?
or
Effects->Colors ?
or If you can think of a better place?
Thanks.
I couldn't make my mind on that, so I left it in Effects menu. Maybe I have better idea after some more user comments...

-
quick note: I fixed a little UI appearance problem (related to win xp theme) about 10 minutes ago,
you may want to re-download (clean your browser cache before that).
-
This plugin extracts a color range from image, by leaving pixels of selected color opaque and making the rest transparent. Only alpha values are altered, color remains intact.
It is useful if you need to edit certain colors on your image separately: duplicate the image layer and run the plugin to get color-based "selection" for further editing.
It is more flexible than Magic Wand or Curves+ which could provide similar results but not always exactly as needed.
Menu location: Effects > Photo.
Download as part of my plugin pack.

Updated to version 2.2 (2008-12-24)!
Changes: few UI and code optimizations; moved to Color submenu.
Updated to version 2.1 (2008-08-31)!
- Compatibility fix for paint.net 3.36
Changes in v2 (2008-01-23):
- Effect is now located in Adjustments menu
- Added check box "Override Original Alpha" (see details below)
- Few minor bugfixes
Use the six color controls (on top) to define your color selection,
and three adjustment controls (on bottom) to adjust the output.
For ease of use, the default color range is defined around primary color. So I suggest to use color picker tool before starting the plugin.
Check box near each color control defines whether you restrict color by this parameter or not. Unchecking equals to selecting the full range.
Tolerance control makes alpha to fade off gradually, based on color's similarity to selected color. Max tolerance makes full alpha gradient from selected color to it's opposite (for example from full bright to full dark, if brightness from 255 to 255 is selected).
Feather control softens edges by blurring alpha channel by selected radius. I recommended to adjust this after all other controls are set, due to heavy impact on processing speed.
Base Opacity control adjusts alpha of "non-selected" color.
Invert Alpha check box inverts final alpha.
Override Original Alpha check box controls how to handle originally transparent/semitransparent pixels:
- unchecked (default) -> transparent pixels remain transparent, even if pixel's color match your selected color
- checked -> transparent pixels turn opaque if pixel's color match your selected color
Reset button returns to default setting (that is: color range from primary color and other controls zero).
Note: greyscale pixels are also treated as color, defined by Hue=0, Saturation=0.
Example:
here I attempted to extract skin tones from the photo. I started with color picker tool and clicked in the middle of his raised arm to get a good color sample. Then opened the plugin, adjusted the color range a bit, finally feathered by amount of 4. Screenshot:

You can learn the behaviour of this plugin on my test image, containing hue, saturation and brightness gradients:
link.
Tip: Feather, Base Opacity and Invert Alpha can be also used independently from color controls (with unchecked Hue/Sat/Brigh); so you may find alternative uses:
- Feather
- Base Opacity: to "un-erase" erased areas
- Invert Alpha: to invert opacity
Enjoy!
-
It works!!!

Plugin will be up soon.
Anything Rick says (see above) takes precedence over my advice.I took Rick's advice and removed SetRenderInfoCalled property. It seems to be redundant indeed.
-
Sorry to discover this so late but:- ...
* Fixed: The Unfocus effect was not handling alpha values properly.
...
Unfocus effect now handles color values of semi-transparent pixels inproperly.
Also, Gaussian Blur handles alpha AND color values of semi-transparent pixels inproperly.
Check this sample with color picker:
Original rectangle on the left is uniform color but bottom side's alpha is reduced to 85 for testing purpose.
Unfocus seems to reduce semitransparent pixel's Value,
while Gaussian Blur reduces both Value and Alpha.
Please kindly fix this.
- ...
-
Great, thanks for advice pyrochild!
It starts to make sense for me now.
Will go and try it out.
-
BoltBait's Transparency plugin removes RGB from transparent areas, if used like this:
Transparent pixels are painted to secondary color.


I want to remove all but one color from a photo.
in Paint.NET Discussion and Questions
Posted
There is just one-step solution too, see my post here:
viewtopic.php?f=12&t=22749#p143464