


Tanel
-
Posts
205 -
Joined
-
Last visited
-
Days Won
3
Posts posted by Tanel
-
-
This plugin is not recognized by the new version of Paint.net 3.5, can you please check it,
Latest version of my plugins (released 2008-12-24) should work fine.
-
Looks like alternative to Shadow/highlight recovery...
You can check for exampe here.I thought about making a Show original button to make it easy to compare but I didn't know how. I will try to find out..In my version the review button is bound to a check box that triggers Identity() pixel op when checked.
If you decide to go for IndirectUI then you could simply add a check box "Show original" where checked state would return original.
Here is the relevant part of my code:
Hidden Content:... private UnaryPixelOps.Identity Nop = new UnaryPixelOps.Identity(); // this op returns original image when "Review" button is pressed public override unsafe void Render(EffectConfigToken parameters, RenderArgs dstArgs, RenderArgs srcArgs, Rectangle[] rois, int startIndex, int length) { ... bool check = token.checkBox2; // that's linked to Review button pressed state ... Surface dst = dstArgs.Surface; Surface src = srcArgs.Surface; if (check == false) // "REVIEW" BUTTON IS PRESSED -> ORIGINAL IMAGE IS SHOWN { Nop.Apply(dst, src, rois, startIndex, length); } else // "REVIEW" BUTTON IS NOT PRESSED -> EFFECT IS RUNNING { ...BTW, are you the guy who created Image Analyzer?
I have learnt a lot of things whith that program, really appreciate!

-
Well, the code itself is not particularly elegant nor educative. Most part of the rendering is just brutal math, without comments about ongoing. That's because I modelled the effect in Excel and just translated the formulas into C#.
Anyway, here is the rough description of the process.
1. Blur the image from src to dst
2. Calculate the brightness of blurred pixels on dst
3. Define a tone curve for brightening/darkening
4. Calculate the amount of brightening/darkening needed for particular pixel, by evaluating the blurred pixel value in relation to the tone curve
5. Apply brightening/darkening to original src pixels and put them to dst
Blur is the key of that effect. Calculating the needed amount of brightening from blurred surface helps to preserve original contrast and texture of the subjects.
Downside is the halos appearing sometimes around large high-contrast subjects.
Here is the main render class from the VS2005 project. I warned you! :wink:
using System; using System.Collections; using System.Drawing; using PaintDotNet; using PaintDotNet.Effects; using PaintDotNet.PropertySystem; namespace ShadowHighlight { // [EffectCategory(EffectCategory.Adjustment)] // used to be in Adjustments menu public class EffectPlugin : PaintDotNet.Effects.Effect { public static string StaticName { get { return "Shadow / Highlight Recovery"; } } public static Bitmap StaticImage { get { return new Bitmap(typeof(EffectPlugin), "EffectPluginIcon.png"); } } //public static string StaticSubMenuName { get { return null; } } // Use for no submenu public static string StaticSubMenuName { get { return SubmenuNames.Photo; } } public EffectPlugin() : base(StaticName, StaticImage, StaticSubMenuName, EffectFlags.Configurable) { this.blurEffect = new GaussianBlurEffect(); this.blurProps = this.blurEffect.CreatePropertyCollection(); } public override EffectConfigDialog CreateConfigDialog() { return new EffectPluginConfigDialog(); } private GaussianBlurEffect blurEffect; private PropertyCollection blurProps; private UnaryPixelOps.Identity Nop = new UnaryPixelOps.Identity(); // this op returns original image when "Review" button is pressed public override unsafe void Render(EffectConfigToken parameters, RenderArgs dstArgs, RenderArgs srcArgs, Rectangle[] rois, int startIndex, int length) { EffectPluginConfigToken token = (EffectPluginConfigToken)parameters; int myred = token.Redvalue; // Color mask int mygreen = token.Greenvalue; // Color mask int myblue = token.Bluevalue; // Color mask int ha0 = token.Highlights; int ht = token.High_T; // Highlights tonal range int sa0 = token.Shadows; int st = token.Shadows_T; // Shadows tonal range int lvl = token.Slevels; // Smoothing int sat0 = token.Hsaturation; // Highlights saturation int sats0 = token.Ssaturation; // Shadows saturation int amp = token.Deepshadow; // Compression bool check = token.checkBox2; // that's linked to Review button pressed state int rad = token.Radius; PropertyBasedEffectConfigToken blurToken = new PropertyBasedEffectConfigToken(this.blurProps); blurToken.SetPropertyValue(GaussianBlurEffect.PropertyNames.Radius, token.Radius); this.blurEffect.SetRenderInfo(blurToken, dstArgs, srcArgs); base.OnSetRenderInfo(blurToken, dstArgs, srcArgs); Surface dst = dstArgs.Surface; Surface src = srcArgs.Surface; if (check == false) // "REVIEW" BUTTON IS PRESSED -> ORIGINAL IMAGE IS SHOWN { Nop.Apply(dst, src, rois, startIndex, length); } else // "REVIEW" BUTTON IS NOT PRESSED -> EFFECT IS RUNNING { this.blurEffect.Render(rois, startIndex, length); for (int i = startIndex; i < startIndex + length; ++i) { Rectangle roi = rois[i]; for (int y = roi.Top; y < roi.Bottom; ++y) { ColorBgra* srcPtr = src.GetPointAddressUnchecked(roi.Left, y); ColorBgra* dstPtr = dst.GetPointAddressUnchecked(roi.Left, y); ColorBgra CurrentPixel; ColorBgra OrigPixel; byte ao, ry, by, gy; float r, g, b, ro, go, bo, vf, vfo, cr, cg, cb, c0, ampx, rx, bx, gx, ha00, sa00, ha, sa, hs, vfoh, cr1, cg1, cb1, cx, rh00, rh1, rhx, gh00, gh1, ghx, bh00, bh1, bhx, sat, sats, satgs, satgs1, rs00, rs1, rs2, rs3, rsx, gs00, gs1, gs2, gs3, gsx, bs00, bs1, bs2, bs3, bsx, stx, htx, dsa0, dsa1, dsa12, dsax, dsax1, dha1, dha0, dha12, dhax, vfx00, vfx0, vfx; for (int x = roi.Left; x < roi.Right; ++x) { CurrentPixel = *dstPtr; r = (float)CurrentPixel.R; g = (float)CurrentPixel.G; b = (float)CurrentPixel.B; vf = ((r + g + / 3f); OrigPixel = *srcPtr; ro = (float)OrigPixel.R; go = (float)OrigPixel.G; bo = (float)OrigPixel.B; ao = OrigPixel.A; ampx = amp / 10f; ha = ha0 / 100f; ha00 = ha0 * 1f; stx = st * 1.1f; htx = ht * 1f; sa = sa0 / 100f; sa00 = sa0 * 1f; sat = sat0 / 100f; sats = sats0 / 100f; vfo = ((ro + go + bo) / 3f); // HALO INTENSITY vfx00 = (vf - vfo); vfx0 = (vfx00 * (float)lvl / 100f); vfx = (vfo + vfx0); // COLOR MASK cr = myred / 100f; cg = mygreen / 100f; cb = myblue / 100f; c0 = vf; cr1 = (r * cr / c0); cg1 = (g * cg / c0); cb1 = (b * cb / c0); cx = ((cr1 + cg1 + cb1) / 3f); // SHADOWS satgs = 1f; // thought I might want to tune this float s0 = 0; if (sa0 > 0) s0 = 1f; dsa0 = (1f + (100f - stx) * 2f / 100f); dsa1 = (50f / (vfx + 10f) - 0.3f * dsa0); // this is our "tone cuve" (actually factor by which Amount control is pre-amplified) if (dsa1 < 0) dsa1 = 0; dsa12 = Math.Min((ampx + 1f) / 3f, dsa1); dsax = (1f + dsa12 * satgs); dsax1 = (1f + dsa12 * cx * sa); satgs1 = (s0 * dsax1 + (satgs + 1f) * (1f - s0)); rs00 = (ro + vfo * (satgs1 - 1f)); rs1 = (ro * satgs1 - rs00); rs2 = (rs00 + rs1 * sats); rs3 = (ro + (ro - vfo) * sats * dsa12 * cx * (satgs1 - 1f)); rsx = ((rs2 * s0 + rs3 * (1f - s0)) / ro); gs00 = (go + vfo * (satgs1 - 1f)); gs1 = (go * satgs1 - gs00); gs2 = (gs00 + gs1 * sats); gs3 = (go + (go - vfo) * sats * dsa12 * cx * (satgs1 - 1f)); gsx = ((gs2 * s0 + gs3 * (1f - s0)) / go); bs00 = (bo + vfo * (satgs1 - 1f)); bs1 = (bo * satgs1 - bs00); bs2 = (bs00 + bs1 * sats); bs3 = (bo + (bo - vfo) * sats * dsa12 * cx * (satgs1 - 1f)); bsx = ((bs2 * s0 + bs3 * (1f - s0)) / bo); //HIGHLIGHTS vfoh = (255f - vfo); dha0 = (1f + (100f - htx) * 2f / 100f); dha1 = (50f / (255f - vfx + 10f) - 0.3f * dha0); if (dha1 < 0) dha1 = 0; dha12 = Math.Min((ampx + 1f) / 3f, dha1); dhax = (1f + dha12 * satgs * cx * ha); hs = (vfoh * dhax - vfoh); rh00 = (vfo - (vfo - ro * rsx) * sat * dha12 * cx); rh1 = (hs + vfo - rh00); rhx = (1f - rh1 / rh00); gh00 = (vfo - (vfo - go * gsx) * sat * dha12 * cx); gh1 = (hs + vfo - gh00); ghx = (1f - gh1 / gh00); bh00 = (vfo - (vfo - bo * bsx) * sat * dha12 * cx); bh1 = (hs + vfo - bh00); bhx = (1f - bh1 / bh00); // FINAL RGB VALUES rx = ro * rsx * rhx; gx = go * gsx * ghx; bx = bo * bsx * bhx; ry = Utility.ClampToByte(rx); gy = Utility.ClampToByte(gx); by = Utility.ClampToByte(bx); OrigPixel = ColorBgra.FromBgra(by, gy, ry, ao); *dstPtr = OrigPixel; ++srcPtr; ++dstPtr; } } } } } } } -
Thanks pyrochild! Control state recalling works well.

However, the UI now crashes PdN at certain situation:
1. Open Curves+
(Do nothing in curves panel)
2. Select "Advanced" from drop-down list
(Do nothing in curves panel)
3. Select "Luminosity" or any other item from the same (upper) drop-down list again
=Crash!

This text file was created because Paint.NET crashed.
Please e-mail this file to crashlog@getpaint.net so we can diagnose and fix the problem.

Application version: Paint.NET v3.36 (Final Release build 3.36.3158.38068)
Time of crash: 11.01.2009 11:10:07
Application uptime: 00:01:16.9843750
OS Version: 5.1.2600.196608 Service Pack 3 Workstation x86
.NET version: CLR 2.0.50727.3053 x86, FX 2.0 2.0SP1 2.0SP2 3.0 3.0SP1 3.0SP2 3.5 3.5SP1 3.5SP1_Client
Processor: 1x "AMD Sempron(tm) Processor 2500+" @ ~1403MHz (DEP, SSE, SSE2)
Physical memory: 1535 MB
UI DPI: 96,00 dpi (1,00x scale)
Tablet PC: no
Updates: false, 4.11.2006
Locale: pdnr.c: en-US, hklm: en-US, hkcu: n/a, cc: et-EE, cuic: en-US
Features log: UpdatesState(StartupState), ShowDialog(PaintDotNet.SplashForm), ShowDialog(PaintDotNet.ToolsForm), ShowDialog(PaintDotNet.ColorsForm), ShowDialog(PaintDotNet.HistoryForm), ShowDialog(PaintDotNet.LayerForm), ShowDialog(PaintDotNet.MainForm), Load(PaintDotNet.PngFileType), SetTool(PaintDotNet.Tools.ColorPickerTool), UpdatesState(ReadyToCheckState), PopulateFonts(), HM(NullHistoryMemento), Menu.Layers.Adjustments, Effect(pyrochild.effects.curvesplus.CurvesPlus), ShowDialog(pyrochild.effects.curvesplus.CurvesPlusConfigDialog)
-----
-----

Exception details:
System.NullReferenceException: Object reference not set to an instance of an object.
  at pyrochild.effects.curvesplus.CurvesPlusConfigDialog.InitTokenFromDialog()
  at PaintDotNet.Effects.EffectConfigDialog.FinishTokenUpdate()
  at pyrochild.effects.curvesplus.CurvesPlusConfigDialog.modeComboBox_SelectedIndexChanged(Object sender, EventArgs e)
  at System.Windows.Forms.ComboBox.OnSelectedIndexChanged(EventArgs e)
  at System.Windows.Forms.ComboBox.WmReflectCommand(Message& m)
  at System.Windows.Forms.ComboBox.WndProc(Message& m)
  at System.Windows.Forms.Control.ControlNativeWindow.OnMessage(Message& m)
  at System.Windows.Forms.Control.ControlNativeWindow.WndProc(Message& m)
  at System.Windows.Forms.NativeWindow.Callback(IntPtr hWnd, Int32 msg, IntPtr wparam, IntPtr lparam)
------------------------------------------------------------------------------
-
Fixed for next release. Should be tomorrow.
(The checkboxes not being remembered as well.)
That was really quick update, but will you share us the goodies too? :wink:
-
This is correct that original Curves behaves identically. But knowing how busy Rick is, I hoped you could fix it faster.
Here is repro steps:
The real-life situation is that I'm processing several images one after another and sometimes want to try same settings for different images, with little fine-tuning.
1. Say I made following curve suitable for my pic1:

Clicked OK.
2. Now I want to try the same curve on my pic2. Open Curves+:

Notice that check boxes are already changed, though that's not my main complaint.
3. With Curves+ still open, I want to fine-tune the previous curves because result didn't look that good. Let's bend the Red curve downwards.

My image still looks bad, so I click Cancel (in order to restart Curves+, with "good" settings from pic1).
4. Open Curves+ again. Although I clicked Cancel in step 3 after modifying red curve, it still returns my "screwed up" curves! :x

Note (to make it more confusing): If I click Reset before fine-tuning (step 3) then the further settings are not saved when followed by Cancel and step 4 really returns the curve I made @ step1 - as it always should. But I don't want to click Reset before fine-tuning previous "good" curve.
-
Could you change the way how control settings are handled: so that the curve(s) and check box states would NOT be stored for next use when I click Cancel? If you wonder what I mean then: open curves+, make some sort of curves, click cancel; then open again - curves are changed although I didn't accept it last time. It's quite annoying.
-
Package updated with several improvements and few additions - see 1st post.
-
Basically, I love the conditional hue/saturation plugin. However, I sometimes find myself wanting other effects onthe specific areas, so is it possible to have a conditional selection plugin that does the same the conditional H/S but just selects the ares instead of doing anything to them?
I hav searched for conditional selection but if somebody has asked this before they may have called it by a different name.
This is exactly why I invented Color to Alpha plugin. :idea:
Duplicate the layer, make a "selection" with this plugin, run your effects, merge layers.
-
I chose Photo submenu because I assumed those functions to be useful for photos only. But as you proved me wrong, I will consider moving it.
I will crop the Adjustments menu soon anyway ("Shadow/Highlight" will be moved into Photo submenu and "Color to Alpha" into Color).
-
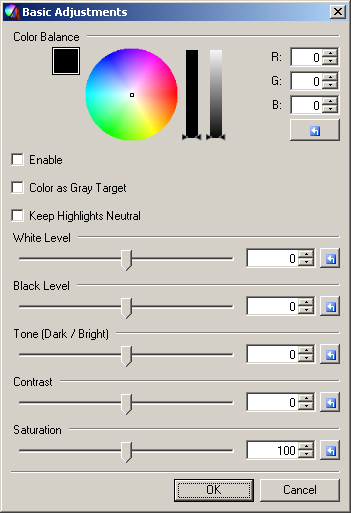
This plugin is my favorite
It brings the best color and tone enhancement tools into a simple intuitive package. Just few clicks to make an image "pop".
Find it as Effects > Photo > Basic Adjustments.
Download as part of my plugin pack.
Current feature highlights (v2.0)
* Easy white balance correction, automatic (based on selected gray target) or manual
* Color-preserving brightness and tone/contrast curve adjustments - keeping hue and saturation intact
>This is now different from built-in levels or curves, where any adjustment shifts hue or saturation.
* Two saturation modes: normal or HSV
>HSV mode is the same that you see in the Colors window. Different from "normal" mode, it always preserves hue and value but tends to change preceived brightness (increasing saturation turns darker and vice versa). You may like it for landscape photos. (Warning: this mode may also make noise more apparent).
* High-precision processing pipeline - producing smooth result
>When applying "usual" adjustments in a sequence, Paint.net truncates color values after each operation (for example red channel value 128 that would end up as 144.5 after levels, will be returned as 144). This adds up when using several effects and may result in visible loss of quality.
Controls
- Color Balance
is very effective to fix white balance. It is same as using levels for R, G and B channels separately - but far easier.
You can make it work automatically if you use color picker before opening the plugin - to point a color in the image that *should be* neutral gray. Then open the plugin and check "Enable" and "Color as Gray Target"; white balance is fixed instantly. If "Color as Gray Target" is unchecked, color is adjusted towards the same hue as color wheel. If checked, then it works opposite way trying to turn the selected color neutral gray.
Check "Keep Highlights Neutral" if bright highlights get too much color cast due to color correction.
- Brightness
sets the brightness of an image. higher number makes brighter, lower makes darker. It can be called "exposure" in terms of photography.
- Black Level
sets the black point of an image. higher number makes black darker, lower makes brighter.
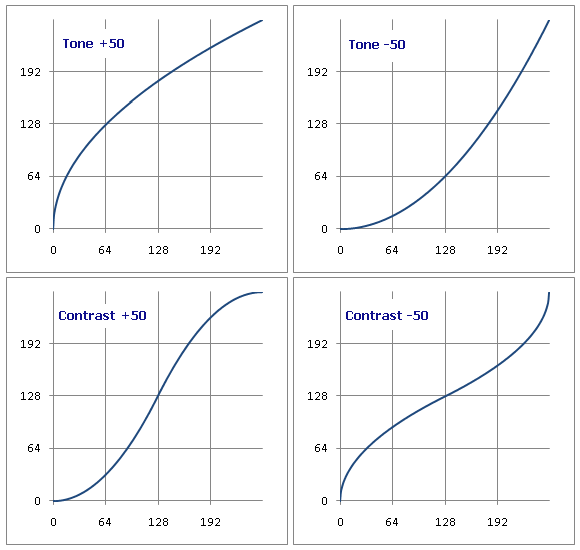
- Tone (Dark / Bright)
applies "brightness curve", making image look darker or brighter. No shadows or highlights are clipped. No color shifts.
- Contrast
applies "s-curve", enhancing contrast of middle tones. No shadows or highlights are clipped. No color shifts.
- Saturation
enhances color intensity. Same as built-in saturation adjustment.
Check "HSV Saturation" to try different saturation effect
- Review
switches to original image in order to check changes
Here is example of tone and contrast curves, as they would look in the Curves dialog.
Changelog:
Updated to version 2.0 (2010-07-20)!
Changes:
* Improved highlight handling at extreme adjustments (brightness, tone, contrast): hue is preserved up to maximum possible brightness (unlike Levels which returns distorted color as soon as brightest channel clips to value 255).
* Slight improvement to black level handling
* Added option "HSV Saturation": this switches saturation adjustment to HSV mode. Result is a little different than usual Saturation.
Updated to version 1.5 (2009-07-08)!
Changes:
* Switched the color handling of Black Level, Tone and Contrast adjustments from RGB-based to brightness-based model. It means that now those adjustments only affect brightness (value) of original colors, while leaving hue and saturation intact. This way the result looks better in most cases, as there is no color shifts that usually occur with regular Levels or Curves.
* Added the Review check box to switch between original and modified image for comparison.
Updated to version 1.1 (2008-12-24)!
Changes: few UI and code optimizations.
Enjoy!

-
... I right-clicked my picture and selected "Refresh Thumbnail". That did the trick.
Damn!
thanks for the tip!
I always hated the wrong thumbnails and wondered how to fix it. Now I feel stupid... :oops: -
There is White Balance plugin in Ed Harvey plugin pack: viewtopic.php?f=16&t=26244
Here is the most convenient way to use it:
1) Before opening the plugin: use color picker to spot a subject that *should be* near white or medium gray.
2) Open White Balance plugin and right click on the left color square. Color balance is corrected automatically.
-
Thanks!
I've always been a big fan of Shadow / Highlight Recovery, although I still don't understand why you don't put this in the Effects > Photo menu.
Good point. Photo submenu seems more appropriate place indeed.
Should I better move Color to Alpha into Color submenu as well? What do you users prefer?
-
This plugin pack contains all my plugins.
Download:
(original:
tanel_pluginpack_20120305.zip)Update 2012-03-05: Alpha Blur v2.
Previous versions:
Update 2011-07-31: New effect Bidirectional Blur, new version of Sharpen+, Shadow/Highlight, LocalContrast, Basic Adjustments.
- Bidirectional Blur is gaussian blur with separated amounts for horizontal and vertical direction. Experimental / fun.
- Sharpen+, Shadow/Highlight and LocalContrast have new blur implementation* and are much more responsive to use.
- LocalContrast can now also reduce contrast. Plus options to apply to Shadows, Midtones or Highlights.
- Basic Adjustments has improved color rendering at extreme settings.
* The blur code is implemented from http://free.pages.at...lter/gauss.html (gauss2.ffp). Thanks to Alois Zingl for this impressive study and permission to use it.
Update 2010-07-22: New effect Grain, new version of Basic Adjustments.
Update 2009-11-02: Color Mixer and Color to Alpha compatible with PdN 3.5 beta.
Update 2009-07-08: Basic Adjustments updated; Black & White Converter updated and added to the pack.
Update 2008-12-24: almost every plugin is improved for rendering performance and quality, plus few minor UI changes and rearrangements in menu locations.
Sharpen+
(Effects > Photo)
V3.1 Updated: few UI and code optimizations.
Details: link
Shadow / Highlight Recovery
(Effects > Photo)
V2.2 Updated: few UI and code optimizations; moved to Photo submenu.
Details: link
Local Contrast Enhancement
(Effects > Photo)
V1.2 Updated: few UI and code optimizations.
Details: link
Color to Alpha
(Effects > Color)
V2.3 Updated: fixed compatibility with PdN 3.5 beta
Details: link
Color Mixer
(Adjustments)
V1.3 Updated: fixed compatibility with PdN 3.5 beta
Details: link
Red Eye Quick Fix
(Effects > Photo)
V1.1
Details: link
Basic Adjustments
(Effects > Photo)
V2.0 Updated: improved color handling, additional saturation option.
V1.5 Updated: UI and color handling model.
V1.1 Updated: few UI and code optimizations.
Details: link
Black and White Converter
(Effects > Photo)
V1.1 Updated: few UI improvements.
Details: link
Eyeshine (Animal Red-Eye) Removal
(Effects > Photo)
Details: link
Grain (noise)
(Effects > Noise)
Alpha Blur
(Effects > Blurs)
performs Gaussian blur on alpha channel (transparency) only. Useful for fading / blending irregular shapes.
V2 Updated: faster performance, added Shift control.
Details: link
(Removed):
Hue / Saturation+
(Adjustments)
has the same functionality as existing Hue / Saturation adjustment, which sadly returns choppy results on gradients. This one keeps gradients smooth. <- No need for this any more - built-in effect has been fixed since Paint.Net version 3.5.2.
-
 2
2
-
-
Update posted today - fixed the speed issues.
Here comes the Codelab source:
#region UICode int Amount1 = 0; // [-30,30] Threshold #endregion UserBlendOps.NormalBlendOp normalBlendOp = new UserBlendOps.NormalBlendOp(); unsafe void Render(Surface dst, Surface src, Rectangle rect) { for (int y = rect.Top; y < rect.Bottom; y++) { ColorBgra* srcPtr = src.GetPointAddressUnchecked(rect.Left, y); ColorBgra* dstPtr = dst.GetPointAddressUnchecked(rect.Left, y); for (int x = rect.Left; x < rect.Right; x++) { ColorBgra CurrentPixel = *srcPtr; int Amount2 = 0; // removed Hue Range control from preliminary version // Fine-tune input parameters, we may drop this block in the future by writing the "good" values directly into the formulas int Amount1x = Amount1; Amount1x += -10; int Amount2x = -Amount2; Amount2x += 2; byte r = CurrentPixel.R; byte g = CurrentPixel.G; byte b = CurrentPixel.B; double ai = (double)CurrentPixel.A; HsvColor hsvColor = HsvColor.FromColor(CurrentPixel.ToColor()); int hue = hsvColor.Hue; int sat = hsvColor.Saturation; //int value = hsvColor.Value; hue += Amount2x; if(hue > 360) hue -= 360; if(hue < 0) hue += 360; // STEPS OF PROCESS: // Take a copy of src surface, // "Cut out" the eye-red color using alpha channel, // Replace red channel values with green, // Blend the result with original // Create alpha multiplier from Hue (alpha multipliers will act as our scissors): // 1.0 for hue above 270; 0 for hue below 260; gradual 10 steps between hue 260 - 270 double axh = 1.0; if(hue > 259 && hue < 270) axh = (hue - 259.0) / 10.0; // Create alpha multiplier from Saturation: // if hue > 259 then it is 1.0 for saturation above 45; 0 for saturation below 40; gradual 5 steps between 40 and 45 // if hue < 260 then it is more complex "curve", based on combination of hue and saturation double axs = 1.0; if (hue > 259) { if (sat < Amount1x + 40) axs = 0; if (sat > Amount1x + 39 && sat < Amount1x + 45) axs = (sat - ((double)Amount1x + 39.0)) / 5.0; } if (hue < 260) { if (sat < hue * 2 + Amount1x + 40) axs = 0; if (sat > hue * 2 + Amount1x + 39 && sat < hue * 2 + Amount1x + 50) axs = (sat - ((double)hue * 2.0 + (double)Amount1x + 39.0)) / 10.0; } // Merge the alpha multipliers: axh *= axs; // Calculate final alpha based on original and multiplier: ai *= axh; byte a = Utility.ClampToByte(ai); // replace red channel with green and apply new alpha: CurrentPixel = ColorBgra.FromBgra(b, g, g, a); // Blend with original CurrentPixel = normalBlendOp.Apply(*srcPtr, CurrentPixel); *dstPtr = CurrentPixel; ++srcPtr; ++dstPtr; } } }-
1
-
-
I will fix my plugins within few days. Maybe worth to collect them into a single plugin-pack then also?
-
Thank you BoltBait, I appreciate it much.
Heh, no wonder then - all my plugin designs are learnt from your examples! :wink:...I fell victim to this error as well. I rebuilt all of my plugins last night.
-
Can you pease explain what are the changes in 3.36 effect render system?
Almost all my previously designed plugins (Sharpen+, Shadow/Highlight, Color Mixer, Color to Alpha, Local Contrast) return distorted images now, like this:

Maybe you can point out what I need to change, for example below is simplified presentation of Sharpen+ :
using System; using System.Drawing; using PaintDotNet; using PaintDotNet.Effects; using PaintDotNet.PropertySystem; using System.Collections.Generic; namespace Sharpen_ { public class EffectPlugin : PaintDotNet.Effects.Effect { public static string StaticName { get { return "Sharpen+"; } } public static Bitmap StaticImage { get { return new Bitmap(typeof(EffectPlugin), "EffectPluginIcon.png"); } } public static string StaticSubMenuName { get { return SubmenuNames.Photo; } } public EffectPlugin() : base(StaticName, StaticImage, StaticSubMenuName, EffectFlags.Configurable) { this.blurEffect = new GaussianBlurEffect(); this.blurProps = this.blurEffect.CreatePropertyCollection(); } public override EffectConfigDialog CreateConfigDialog() { return new EffectPluginConfigDialog(); } private GaussianBlurEffect blurEffect; private PropertyCollection blurProps; public override unsafe void Render(EffectConfigToken parameters, RenderArgs dstArgs, RenderArgs srcArgs, Rectangle[] rois, int startIndex, int length) { EffectPluginConfigToken token = (EffectPluginConfigToken)parameters; PdnRegion selectionRegion = EnvironmentParameters.GetSelection(srcArgs.Bounds); Rectangle selection = EnvironmentParameters.GetSelection(srcArgs.Bounds).GetBoundsInt(); int rad = token.Radius; int amt = token.Amount; this.blurEffect.Render(rois, startIndex, length); for (int i = startIndex; i < startIndex + length; ++i) { Rectangle roi = rois[i]; for (int y = roi.Top; y < roi.Bottom; ++y) { ColorBgra* srcPtr = srcArgs.Surface.GetPointAddress(roi.X, roi.Y); ColorBgra* dstPtr = dstArgs.Surface.GetPointAddress(roi.X, roi.Y); ColorBgra CurrentPixel; ColorBgra OrigPixel; byte r, g, b, ro, go, bo, ao, ry, by, gy; for (int x = roi.Left; x < roi.Right; ++x) { CurrentPixel = dstArgs.Surface[x, y]; r = CurrentPixel.R; g = CurrentPixel.G; b = CurrentPixel.B; vf = (float)CurrentPixel.GetIntensityByte(); if (selectionRegion.IsVisible(x, y)) { OrigPixel = srcArgs.Surface[x, y]; ro = OrigPixel.R; go = OrigPixel.G; bo = OrigPixel.B; ao = OrigPixel.A; // ..... // pixel level calculations here // ..... OrigPixel = ColorBgra.FromBgra(by, gy, ry, ao); *dstPtr = OrigPixel; ++srcPtr; ++dstPtr; } } } } } } } -
I think the greatest value of the new plugin is providing good result with less effort = better user experience.Hey Tanel, can you explain how this is better than the built-in Red Eye Removal? I'm genuinely interested in the mathematical detailsYou can best learn the behaviour by using it on the colorwheel screenshot, or this testimage.
I tried to find the best "color cut" between eye-red and pink skin tones. Then bound that cut-line to UI control (threshold).
I was looking for some feedback before posting the source code. I'll clean it up and post it here tomorrow.
-
Thanks for your comments!
It's not that simple, the eyeshine phenomenon has quite different character color wise. I couldn't even find any good PS tutorial for that, other than ones suggesting to paint it over.Well, I'd like to have "red" eye removal for animals, too. This was requested before, but I will not spend my time searching the threadI'm no coder, but it's just yellow-green instead of red... :shock:
I would say it is doable but should be a separate plugin. This one must keep UI as light as possible IMO.
-
This is my early version of improved red eye removal (the need for this was revealed during a discussion here).
It is supposed to provide great results with minimum effort. Just select the eyes and run the plugin. Default setting should be suitable in most cases. Usually it is okay to select both eyes together with a coarse rectangle selection and keep skin tones untouched by little threshold adjustment. But the more precise selection you make around eye pupils, the more there is room for adustment.
Edit: new version with better speed performance:
Below is the parade of before-and-after samples I tested. Most of those were fixed with default setting. All were fixed with coarse selection (whole upper face selected).
I'm very much interested in your feedback and also examples where this plugin didn't work.

-
Perhaps you could change yours to match?
Regardless of what type of UI is employed, the rendering algorithm is still not very good.
I bet Tanel could write a better algorithm.
...
Yes!

To be honest I never paid attention to red-eye removal effect.
But I certainly see potential there.
Perhaps I post something in the plugins development section soon.
-
You could try different freeware for that operation if not satisfied with PdN output.
For example Irfanview, which is a little bit better when resizing with Lanczos filter.
Then copy it back to PdN for sharpening etc.


Black and White Converter v1.1 (2009-07-08)
in Plugins - Publishing ONLY!
Posted · Edited by toe_head2001
Fixed broken image
Here is something to play with!
Download as part of my plugin pack.
Open from Effects>Photo
Updated to v1.1 (2009-07-08)!
Few usability improvements:
* Default color for channel mixer is fixed to a certain green (rgb:76,150,29) in order to produce "standard" gray balance
* Removed the "Enable" check box for channel mixer, as now you can return to standard gray by using channel mixer's reset button
* Default color for Tint is primary color (was secondary before)
The slider controls are same as in my Basic Adjustments plugin. Color wheels are different.
- Channel Mixer
Adjusts how much weight each color channel transfers to final brightness. If reset to default then „standard“ grayscale is applied.
- White Level
sets the white point of an image. higher number makes white brighter, lower makes darker. It can be called "exposure" in terms of photography.
- Black Level
sets the black point of an image. higher number makes black darker, lower makes brighter.
- Tone (Dark / Bright)
applies "gamma curve", making image look darker or brighter. No shadows or highlights are clipped.
- Contrast
applies "s-curve", enhancing contrast of middle tones. No shadows or highlights are clipped.
- Tint
Applies a shade of single color to final image. The result is similar to Colorize effect in PS (based on my few quick tests).
Check box „Pick hue and saturation only“ makes it easier to work with the color wheel: when checked, it disables the color value slider and uses constant value around 40 instead of default 100. This is because darker colors are usually better for tint. Uncheck this option to fine-tune the result with color value slider.