


dairyman
-
Posts
28 -
Joined
-
Last visited
Posts posted by dairyman
-
-
Well here's the link. You will find the effects under Effects>Distort
-
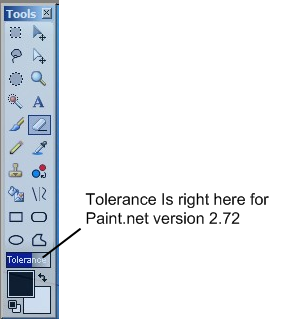
Well, thanks but how do I select the tolerance level? I couldn't find it at all.
Left: This is where the tolerance bar is for paint.net 2.72...
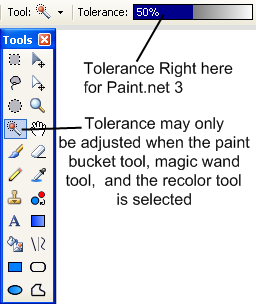
Right: And here it is again for the pre-release 3.0 version
Dairyman, I think that would make a nice tutorial, though some would consider it just an explanation of the magic wand tool, so maybe I'm wrong.I just think this is a simple explanation for the magic wand tool. Most people know this information already so it wouldn't make such a good tutorial. Thanks anyways

-
It seems like the render that you are trying to cut out is on a background of one color like the sonic below.(It may be harder if the background of your render has lots of different colors.)
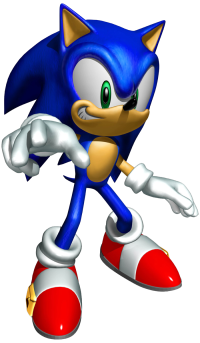
Correct me if I am wrong, but if the sonic posted above was your render, you only want the sonic.
There are actually TONS of different ways that you can cut out that render, but the easiest way to do it is by using the magic wand tool.
First off, what the magic wand tool does is select colors with similar RGB levels. This can be varied by the amount of tolerance. The higher percentage of tolerance, the more colors are selected, and vice versa.
Using the magic wand tool, select the portion of the image that you don't want. In my case, it would be the white background of sonic. Some colors in your render may have similar colors in the background so when you select the background, some parts of the render may also be selected. To fix this, just adjust the tolerance level of your magic wand. With the background completely selected, press the delete button on your keyboard. Now press Ctrl+A and copy your render into another canvas with your sig.
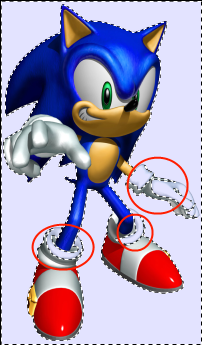
In this example, 50% tolerance was used to select the background. Notice how some of the closer RGB leveled colors were also selected.

With a tolerance of 29%, it is "Just right"
-
Huh? It says "Open with > Paint.net 2.70 for mine...
-
WOW... Congrats to the winner!!! And if you are too lazy to go back to the first post, the winner is Jake2K
-
Hmmmm.... I hope this helps
-
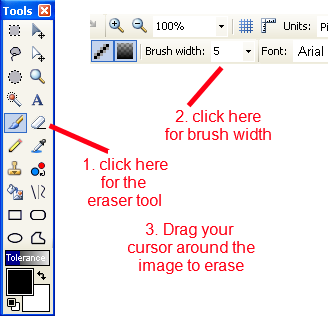
hallo illnab that is not what i mean. I mean disapearing the total background in one click after you get the checkerboard pattern and after you can use a new layer like in
C:\Program Files\Paint.NET\Help\en\EraserTool.html
Ok... After you erase the backround, you should get the squirrel with the checkerboard backround. Now go to layers>add new layer (or press ctrl+shift+N. A new transparent layer should have showed up in your layer's dialogue like so:
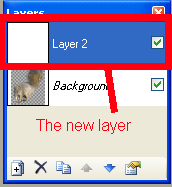
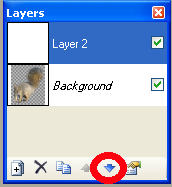
Then press the 'down button' on the layer's dialogue to move down the layer you have just created:
Now that the layer has moved below the squirrel, press the fill tool in the tools menu, or press F on your keyboard.
Next, select the color you want for the backround and make sure your layer 2 is the active layer by clicking on it...
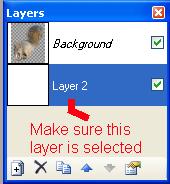
Now click on the image with the fill tool, and your done!!!
-
Try saving it as a .PNG image
-
dairyman, your sig is broken. Please fix it.
Lol... Sorry about that :oops:
-
I don't think you uploaded the pictures :shock:
-
Excuse me for this question but how do I install this plug-in. I've downloaded it, transferred the dll to Effects but now realize that's probably the wrong place to send it to. Appreciate help.
Transfer the .dll to 'Filetypes'
-
I don't know if this is what you want, but can't you just click 'move selection', hold shift, and stretch the selection?
-
If you installed paint.net in the default folder, then put the .dll plugin in this folder and then restart paint.net if you have it open :wink:
C:\Program Files\Paint.NET\Effects
-
Why did he got banned? :?: :?:
He got banned because he kept on arguing about airbrushes and how it should be put into paint.net. Even though Rick warned him, he still kept on doing it. No offense to George but I enjoy looking at aatwo's George comics
-
Wow! Those are lots of features to implement :shock:
-
Aatwo posted a post about thought bubbles. Here it is if you want is
http://paintdotnet.12.forumer.com/viewtopic.php?t=1204&highlight=
-
Yes, of course paint.net is not better than photoshop, but you must remember that there are many who cannot afford photoshop and that paint.net is a free program which is easy to use and that everyone can use
 If you like photoshop better, than use photoshop.
  Btw, I am pretty sure that some of the more experienced users of paint.net can create the same effect as that picture you have.
(P.S. Jesus is MY savior)
-
Ok Vanessa. I got your PM...And I'll use your example "V"
1. Click the magic wand select tool and adjust the tolerance so that it selects the necessary amount of the image.


2. Click on the part of the image which you don't want... In this case, it's the white on the outside of the "V". Your image should now look like this:

3. And now click on the del button on your keyboard or go to Edit>Erase selection. Your picture should now be transparent. The checkerboard backround is just to indicate that, that part of the photo is transparent.

This is your finished Product!
DO NOT FORGET TO SAVE YOUR PHOTO AS A PNG.
OR ELSE IT WILL NOT WORK.

Your done! :wink: I hoped this helped because this is as specific as I can get. If you want to select a part of a photo with more colors and details, I recommend SearedIce's magnificent "Cutout Effect"
http://paintdotnet.12.forumer.com/viewtopic.php?t=1100
I hope there's not too much pictures
:oops: Note: Internet Explorer currently does not support .png transparency. So you have to view it on Mozilla Firefox
-
Select the part of the photo which you want to be transparent and simply press del. Save the photo as a PNG. so it maintains the transparency... Hope this helped
-
Thanks BuzzKill!
I never thought anyone would ever admire my work... Also thanks to those who posted their tutorials! They helped me a lot. :wink: -
Nice work BuzzKill, I can't wait to try them out, but the download doesn't seem to work...

-
Try extracting the .dll files to this directory:
C:\Program Files\Paint.NET\FiletTypes
Or wherever you installed paint.net
-
I think thats what he said... :wink:
7. Shift-click on the pixel --- this will select all pixels of that color on the whole image
selected region.
-
Wow! That's an awesome picture!
 Btw, I am pretty sure that some of the more experienced users of paint.net can create the same effect as that picture you have.
Frozen Text Now with a guide to ALPHA MASKS
in Tutorial Graveyard
Posted
You're finished product will end up much more anti-aliased.