


Crazy Man Dan
-
Posts
4,171 -
Joined
-
Last visited
-
Days Won
4
Posts posted by Crazy Man Dan
-
-
The "Choose Defaults" dialog allows you to set your default startup tool, as well as the default settings for the tools that have them. You can access this dialog by clicking the "Tool" button on the far left of the toolbar. It is the first option.
You can read more about these settings on this page of the Paint.NET online Documentation.
-
That character is a very widespread meme. Plenty of PNGs of that image without the white background already exist, such as this one here. If you're having trouble removing the white background yourself, you could just grab one that already has the white background removed.
-
Do not 'bump' your own thread unless it has received 0 replies and it has been 24 hours since you posted it.
We are here to help, but we are not at your beck and call. Indignation after a mere 11 minutes with no response is ridiculous and disrespectful.
The answer welshblue gave should be plenty to answer your question. For a visualization of what is going on with transparency, you can read through the help docs regarding Working with Layers.
Thread Closed
-
Oh man, this takes me back - back to before Paint.NET even had a gradient tool.
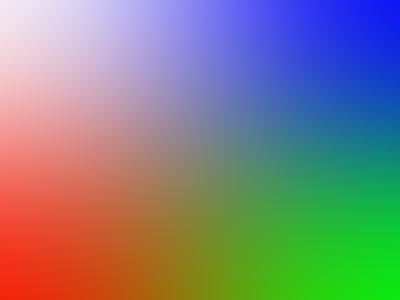
What you could try for a quadrant gradient as you describe is:
- Create a new canvas at 2px by 2px
- Use the Pencil tool to mark a single pixel of your desired colors in each quadrant - for this example: white top-left, blue top-right, red bottom-left, and green bottom-right
- Open the Image > Resize dialog and
- Set the Resampling to "Bicubic"
- Scale your image up to your desired final dimensions
- Set the Resampling to "Bicubic"
The Bicubic resampling method will blend the colors together in a gradated fashion. If I'm understanding you correctly, this should produce an effect similar to what you're looking for.
- Create a new canvas at 2px by 2px
-
Regarding Administrator privileges, that will happen when trying to navigate to the Fonts folder from the browse dialog. I would suggest accessing the folder from Windows Explorer, copying the OTF in question, pasting it on your Desktop or somewhere else easily accessible, and uploading that copy.
Regarding the missing glyphs, I'm afraid I cannot help you there. I do not have that particular font, so I cannot toubleshoot. I would try converting a copy, installing that one, and seeing if the behavior continues.
-
In general, yes, as TTF files will work straight away.
A quick Google search turned up this converter: http://www.freefontconverter.com/
I gave it a test with one of the OpenType fonts I had installed, replaced the OTF with the TTF version it gave me, and Paint.NET picked it up. So, if there's an OTF font you need to use in Paint.NET, try running it through the converter and installing the resulting TTF instead. Always keep the OTF version around in a folder somewhere, just in case you ever need the original.
-
Paint.NET uses the same font list as the system, so to add a font to Paint.NET, it need only be installed to the Windows Fonts directory.
However, Paint.NET does not support OpenType font formats, only TrueType fonts, so I'm afraid the file you mentioned will not work.
I know there are ways to convert font files to different formats, but I've never tried converting from OTF to TTF for use in Paint.NET. What is the name of the font in question?
-
You can indeed paste text. To do so, simply copy your text to the clipboard, click on the canvas with the text tool to activate the caret, and paste. That way, you can type up your content in a document editor to take advantage of spelling/grammar checking, then copy/paste it into Paint.NET and format your verified text for presentation.
-
Essentially, the Magic Wand selects areas of a color.
There you go, five words. Now a few more for clarification: If, for example, you click on a red part of the image, the tool will create a selection expanding outwards from that point of any red pixels next to it, continuing to do so until it hits a different color. The Tolerance slider in the toolbar determines how picky it is on how close the color has to be to the first pixel you clicked before it stops selecting.
Honestly, the easiest way to see what it does is to play with it - draw a black Filled Shape on the white background of a new image, switch to the Magic Wand, and click inside and outside the shape. The tool expands out until it hits the boundary between the colors, essentially selecting the shape or everything outside the shape.
As for Smudge, it is not built in to Paint.NET, but you can install a plugin that allows you to smudge a layer.
You can find out more about the plugin here:
In the future, try giving http://searchpaint.net a shot. Searching "Smudge" returns the plugin you need as the first result.
Regarding Cropping, there is no dedicated cropping tool, but there is Crop To Selection. The command does exactly what it says: crops the image to the size of the active selection. When an active selection exists, the button on the toolbar becomes clickable. So, to crop a photo, use the
 Rectangle Select Tool to draw a rectangle around the part of the image you want to keep, then hit Image > Crop To Selection or the Crop To Selection button on the toolbar.
 -
Paint.NET has a gradient tool (
 ), directly to the right of the Paint Bucket in the Tools window. It can also be accessed by the keyboard shortcut "G".
 -
From the Frequently Asked Questions thread:
(1) Will it ever be ported to Mac OS, Linux, or any other operating system?(2) What about Mono support? Wouldn't that be really easy?
We will not be doing any work to directly support Mac OS, Linux, Mono, or any other platform. We are doing this in order to focus on the best quality and support for the platform that we develop on: Windows with .NET. Also, we simply do not have the resources or expertise to do any of this work.
So no, Paint.NET is not available for any flavor of Linux.
If you're looking for a Paint.NET-like editor for Linux, you may want to check out Pinta: http://pinta-project.com/
-
The desire for a better printing interface is already acknowledged in the Popular Feature Requests thread. No further discussion is needed at this time.
In addition, this particular thread is more than 10 months old, well past the three month dead-line stated in the Forum Rules. As such, this thread is locked.
-
Raster images will always lose quality when scaling up. As for vector editors, Inkscape is by far the best free option I've found.
If it's not vector already, you'll want to take the background image into Inkscape and do a Bitmap Trace on it to get a vector representation of the raster image. The effect on the image already gives a pretty hard-edged effect, so the vector approximation should be fairly faithful. The glow behind the text is not a problem - SVG blur works the same as your basic Gaussian blur, and it's non-destructive.
-
A poll with one option is the quintessential example of a useless poll. Deleted as per Rule 21.
-
I'm more surprised by:
Paint.NET supports commonly used image editing features such as layers, transparencies, pinpoint color selection, and even vector drawings.Emphasis added
I'm fairly certain Paint.NET doesn't do vector. I don't think I was away from the forum that long...

-
I'm not sure about the first scenario you described - being unable to continue typing - but for the second scenario - being unable to move the text - were you clicking the Move Text grabber and it wasn't responding, or was the grabber completely gone?
The Ctrl key on its own toggles the visibility of the grabber, so, if the grabber was gone, it is possible that you accidentally hit the Ctrl key an extra time during the paste process. If you're ever in that situation again, try striking Ctrl once more and see if it reappears.
-
Paint.NET is strictly a raster editor, so you're not actually drawing objects. You can manipulate the settings of a shape while it is actively being drawn, but once you click to finalize it, that shape is stored merely as a group of pixels on a layer - you cannot interact with it again in that manner.
As Sarkut suggested, however, you can use the Outline Object plugin to add a border separately after you've created the shape, provided you drew it on a new layer all its own.
-
Sounds like you need to flip the image. Under the Image menu, select "Flip Horizontal" and see if that sorts it.
-
Because of the way PNGs store information, the final bit size of a PNG can vary wildly between two pictures even if they are the same pixel dimensions. Photos are usually more easily compressed with JPG, whereas line art or vector type images with large areas of the same color are generally very much smaller with PNG. You should use whichever format best fits the scenario, but you should try to remain around a consistent quality setting for all photos on a single page.
As far as the decreased SEO value of image-heavy pages, you can mitigate that by including descriptor attributes such as alt and title on your img tags to provide a textual alternative for Google to chew on. The alt attribute is technically required anyway.
Finally, regarding the slow loading, if I'm understanding correctly, it sounds like the page to which you are referring is an image gallery. If that is the case, I would suggest implementing a gallery script if you have not already. Scripts of this sort allow you to place only the thumbnail image on the page, with the full image being shown in an on-page pop-up when the user clicks the thumbnail. This ensures that the user only has to load the images they explicitly request, keeping the bandwidth down, significantly in most cases. The gallery script I used most often before I started writing my own was a jQuery script called Thickbox, but it looks like the developer moved on to other projects a few years ago, so it is presently "unsupported". I imagine it would still work perfectly fine, but he does offer a list of active alternatives at the top of the page.
-
You can go in with a program like TweakPNG and remove the gAMA attribute manually, but if you've got a lot of images to go through, it could get tedious.
-
The problem is with IE7's rendering engine (which is essentially what IE8 Compatibility View is).
Looks like line 13 of style.css is the problem, where both the html document and the body node are set to 100% height. It's an unnecessary declaration to begin with, since both elements are automatically assumed to extend to the height of the content, and it's what's causing the unintended behavior. Percentage declarations set the element to the dimension of its parent, so what IE7 is doing is setting the body to 100% of html, and html to 100% of the window. Ultimately, this means footer gets absolutely positioned at the bottom of the viewspace based on the height of the window, covering over the text there.
I tested nixing line 13 in IE7, IE8, Firefox, and Chrome. The problem was fixed in IE7 with no ill effects in any of the other browsers/versions.
@Rick: I'd suggest your web guy remove that line.
@bean59: I'd suggest that you upgrade to IE8 if at all possible. If you have the IE Developer Toolbar you can go in and deactivate that line to fix it, but you'll have to re-do it every page load.
-
There is a Quality option in the toolbar if you rotate via right-clicking with the Move Selected Pixels tool (
 ). Change that from "Smooth" to "Pixelated", and it won't anti-alias the result. You won't be able to rotate to an exact angle via text box as you can with Rotate/Zoom, but you can hold the Shift key to constrain the rotation to 15-degree increments.
 -
Personally, I would suggest replacing WinRAR with 7-Zip. It's actually free, forever.
-
I'm afraid your post breaks our "necroposting" rule, as this thread has been inactive for 8 months. As such, I must close this thread.
To anyone looking for a solution using existing tools, may I suggest making a new layer and using the Line/Curve tool
 to draw a line following the slanted horizon of the photo you wish to straighten. As you are drawing, the angle of your line is shown in the status bar in the lower left. Remember that angle, switch to the photo layer, and use Layers > Rotate/Zoom to rotate the photo by the inverse of the angle.
It's not automated, but it is the same process an automatic straightener tool would use.
 Rectangle Select Tool to draw a rectangle around the part of the image you want to keep, then hit Image > Crop To Selection or the Crop To Selection button on the toolbar.
 ), directly to the right of the Paint Bucket in the Tools window. It can also be accessed by the keyboard shortcut "G".
 ). Change that from "Smooth" to "Pixelated", and it won't anti-alias the result. You won't be able to rotate to an exact angle via text box as you can with Rotate/Zoom, but you can hold the Shift key to constrain the rotation to 15-degree increments.
 to draw a line following the slanted horizon of the photo you wish to straighten. As you are drawing, the angle of your line is shown in the status bar in the lower left. Remember that angle, switch to the photo layer, and use Layers > Rotate/Zoom to rotate the photo by the inverse of the angle.
Paint.NET Setup Front-End is trying to access the Internet
in Paint.NET Discussion and Questions
Posted
^ Gotta admit, I was hoping that link would be about zombie smilies...