


Nai
-
Posts
165 -
Joined
-
Last visited
-
Days Won
9
Posts posted by Nai
-
-
-
Another piece of feast for my eyes ! Congrats !
-
-
Congratulations to all winners !
Glad to see more people participating in this competition. Hat off !
-
Here's mine, 'Bright Winter' palettes inspired by the late Kathryn Kalisz's Sci-Art Bright Winter colours.
Bright Winter 1
Hidden Content:; paint.net Palette File
; Lines that start with a semicolon are comments
; Colors are written as 8-digit hexadecimal numbers: aarrggbb
; For example, this would specify green: FF00FF00
; The alpha ('aa') value specifies how transparent a color is. FF is fully opaque, 00 is fully transparent.
; A palette must consist of ninety six (96) colors. If there are less than this, the remaining color
; slots will be set to white (FFFFFFFF). If there are more, then the remaining colors will be ignored.
FF740169
FF99002E
FF060064
FF605D58
FF141414
FFD7D1ED
FF82A44D
FF9A2947
FF842336
FF662247
FF2F2F6D
FF16534C
FF135F7F
FF1B305F
FF241E20
FFF9C35F
FFBE1999
FFD90E68
FF210385
FF9E9D99
FF3C4242
FFFDD2ED
FFABD358
FFDB406C
FFCE2B4A
FFBE3376
FF5F4E9C
FF1FA793
FF26A0CF
FF1F58A9
FF2B2122
FFB0B1B3
FFCF0170
FFD30015
FF012478
FFCCCCC4
FF96A19B
FFB2E5DE
FFFDCC66
FFD3363F
FFE64F70
FF832A6A
FF632D6B
FF13643B
FF4CC7E9
FF5C94CD
FF1E2C53
FF232959
FFD50076
FFFF0F4E
FF1339A4
FFE4E2D6
FFB9BFBD
FFF7D1D0
FFFED96E
FFE54D5C
FFDC4A71
FFC64794
FF9B4292
FF1AA856
FF259FA4
FF264F9F
FF264F9F
FF6059A7
FFE85CC9
FFFF5174
FF008BE2
FFFFFFFF
FFCFD1D0
FFEFE5AA
FFF3DD78
FFF47C86
FFF378A6
FFF078BF
FFE078C7
FF41D287
FF50D4E0
FF71B6E0
FF587EC9
FF857DC6
FFD00072
FFFBD5E2
FF018FA7
FFDAD5DB
FFBDBFCC
FFF7ECAC
FFF1E24B
FF710111
FFF761AB
FFED5DBE
FFE61C66
FF008D31
FF3BC4F2
FF5C67D3
FF2B29B0
FFD4D3F2Bright Winter 2
Hidden Content:; paint.net Palette File
; Lines that start with a semicolon are comments
; Colors are written as 8-digit hexadecimal numbers: aarrggbb
; For example, this would specify green: FF00FF00
; The alpha ('aa') value specifies how transparent a color is. FF is fully opaque, 00 is fully transparent.
; A palette must consist of ninety six (96) colors. If there are less than this, the remaining color
; slots will be set to white (FFFFFFFF). If there are more, then the remaining colors will be ignored.
FF724095
FFCE1B52
00FFFFFF
FF433A3F
FF000000
FFCFCBFE
FF5F831F
FF7E0123
FF5E0207
FF370020
FF01004E
FF050F1B
FF001E64
FF000040
FF000000
FFDC9C21
FFE1A4C5
FFE71D8B
00FFFFFF
FF9D939B
FF080B1A
FFF6C8F7
FF9BD71F
FFD40557
FFC70122
FFBD0160
FF241395
FF067C86
FF0382E3
FF031EAB
FF000000
FFB8B5BE
FFFF997B
FF9A202B
00FFFFFF
FFDED8DC
FF868992
FFACEDEF
FFEBB328
FFD20317
FFE31955
FF5E024D
FF300149
FF03230B
FF3AC2FE
FF04056F
FF000022
FF01002A
FFF8F2B6
FFD5E022
00FFFFFF
FFFBF5F9
FFBFC1CD
FFFECFDF
FFF9D036
FFEE1D45
FFDF0B60
FFB3188D
FFC84EC7
FF007F30
FF037AA2
FF0052DC
FF000C96
FF2524A6
FF0F9242
FF367653
00FFFFFF
FFFFFFFF
FFD8D7E5
FFF6EDA2
FFF3D84B
FFF4566F
FFF95AAE
FFEB59C8
FF30024B
FF33C680
FF3ECDF9
FF58A4FC
FF2455D5
FF5157CF
FF485393
FF282C73
00FFFFFF
00FFFFFF
00FFFFFF
00FFFFFF
00FFFFFF
00FFFFFF
00FFFFFF
00FFFFFF
00FFFFFF
00FFFFFF
00FFFFFF
00FFFFFF
00FFFFFF
00FFFFFF -
Nai, very beautiful gemstones!
 The coloring is great!
Thanks !
-
Nice technique! I'll have to try it out.
Thank you, Nai!


Welcome !
However, using silver/mirror texture on diamond/moonstone/opal or other fair-coloured stone needs a different technique. I'm still experimenting with it.
-
Here are another tip ( to create emerald, shappire, ruby or any possible gems ) :

Other gems can be found here : http://forums.getpaint.net/index.php?/topic/30266-nais-studio-collections-gems-collections-february-25-2016/#entry512773
All the best !
-
 1
1
-
-
New images added :


-
2
-
-
I like the 'laser' light beams coming out of the gem too!

Perhaps explore the laser idea more?... some 'pink panther' like security device (laser beam broken, alarms sound)?
Or if they are glints of light try spectrum colours in the light 'flares'?
Sharing is caring, so I'll share the tips right here.
Well, to get this special effect, I have to change some of the original procedures.
1. Motion Blur method and Splinter Blur method are staying the same.
2. Changes were been made to Gradient Galore Method and Bevel Object Method.
It'll be a very long writing to explain the changes, so I decide for writing short notes and pictured diagrams to make things easier.
Here are the tips to get this special effects ( uniquely to this gem, you can alter this according to your own case ) :
 (a) Regular fill tool, Normal 255( b ) Regular gradient fill ( Radial ), Normal 137( c) Regular gradient fill ( Radial ), Screen 64(d) The Gem Shape original frame, Line width 1, Normal 255(e) The Gem Shape filled with Gradient Galore, Normal 255.(f) The Gem Shape filled with Gradient Galore, Gaussian Blur ( try and success ), Normal 255.(g) Regular fill tool ( Royal Blue ), Gaussian Blur ( try and success ), Normal 73(h) Gradient Galore, Screen 39(i) Gradient Galore, Overlay 19 ( Note : This layer is optional )(j) Regular fill tool ( white ), Screen 39(k) This layer following Red Ochre's procedures, put into Glow 43 after merging those layers.(l) This layer following Red Ochre's procedures, however filled by regular gradient fill tool instead of gradient galore ( to emulate glassy effect from my glassball siggie ), Reflect 129(m) Regular fill tool, Screen 178(n) Following Red Ochre's procedure to get Object, then select that Object and run Boltbait's Bevel Selection, Screen 88(o) Following Red Ochre's procedure to get Splinter layer, Color Dodge 101(p) Copy layer (o), Gradient Galore, Color Dodge 148(q) Duplicate Splinter layer, Gaussian Blur ( try and success), Overlay 88( r) Run Red Ochre's Highlight plugin, choose Venus 5 Ways.All the best !
-
2
-
-
lnyxster4 & Eli, thanks !
I have aimed my best to soften the outer edges and here are the results :

-
2
-
-
Good work Nai!
I'm glad you found some of the techniques useful and thanks for posting the image.

Thanks !
However I'm not sure about this one :

-
2
-
-
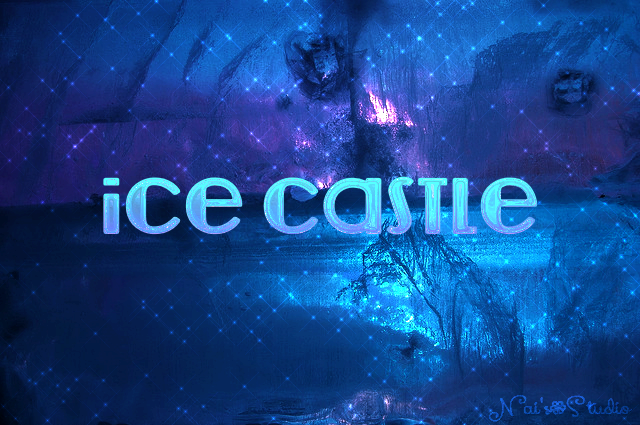
Here are what I can do with your tutorial, with some personal adjustments :

-
3
-
-
Nice works!I sure would like to know how you did the ice castle works.
Hi !
Here are the tutorial that can explain how I'm working with that image :
http://forums.getpaint.net/index.php?/topic/107496-starry-image-with-glassy-text/
All the best !
-
This tutorial is available as a PDF. Click here to view or download it
@Nai said: "This tutorial is dedicated to @johnnysdream who was curious about how I made this image".
Moderator's Note: As a lot of the images from @Nai had disappeared it was necessary to recreate her steps and the results may not
be exactly as @Nai intended. The editing of these steps have been made possible by @Pixey - @ReMake and @Woodsy
This tutorial is a combination of @Red ochre's Clipwarp plugin ( either one can work ) and an adaptation to a Photoshop tutorial made by Jenny Le. (comments by by @Nai)
Plugins used are: Clipwarp - Objectedge & Noise choice by @Red ochre found in his pack here. + Bevel Selection by @BoltBait
and Threshold by Ed Harvery.
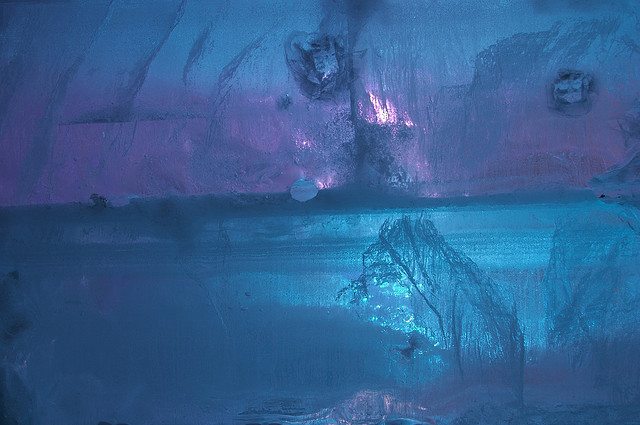
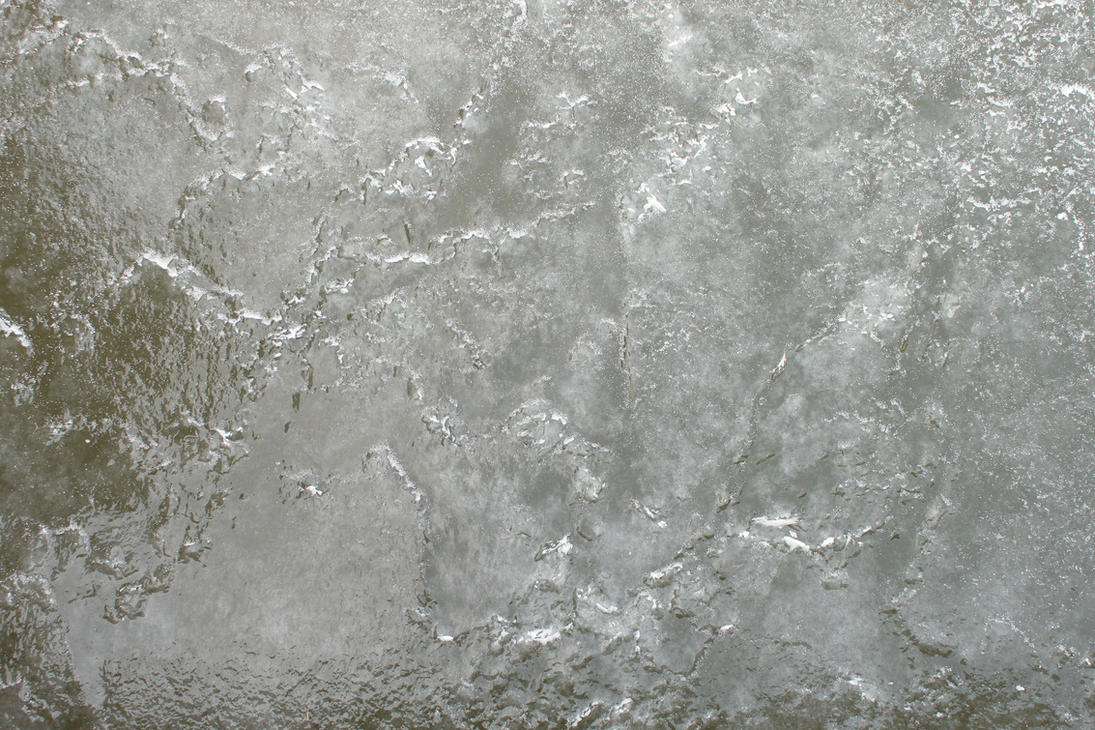
There are two parts to this tutorial in order to achieve the desired results. Here is the image used in the tutorial.
First Part : 'Ice Castle' text.
1. Upload the above image into Paint.net. Use - Image - Crop to selection - to fix the canvas size.
2. Create a new layer. Type your text (Riot Squad was used here) size #84 with the color hex #808080.
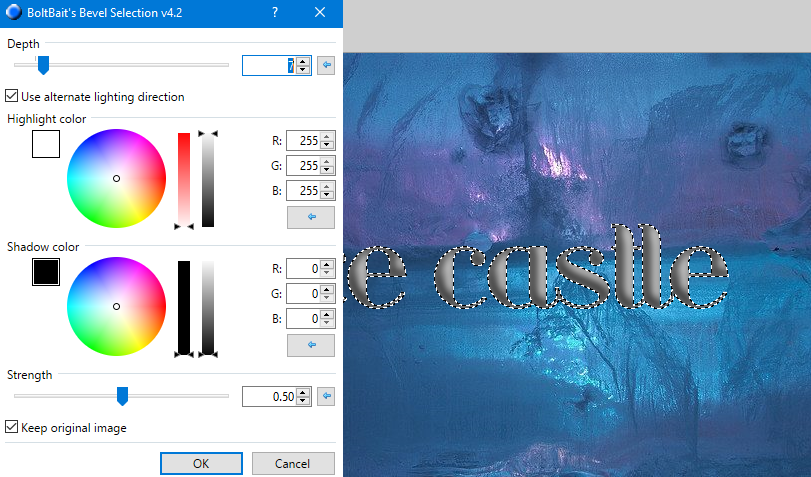
3. Align the text to center. With the Magic Wand
 set to Global, select the text and Invert the selection. Use Bevel Selection @ #7 and alternate lightning direction checked.
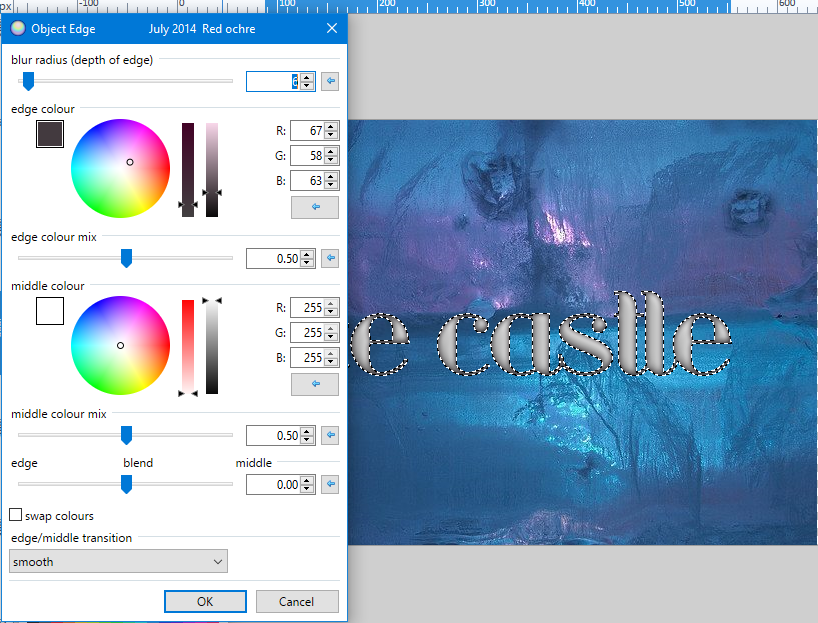
4. Run Red Ochre's Object Edge plugin with this setting :
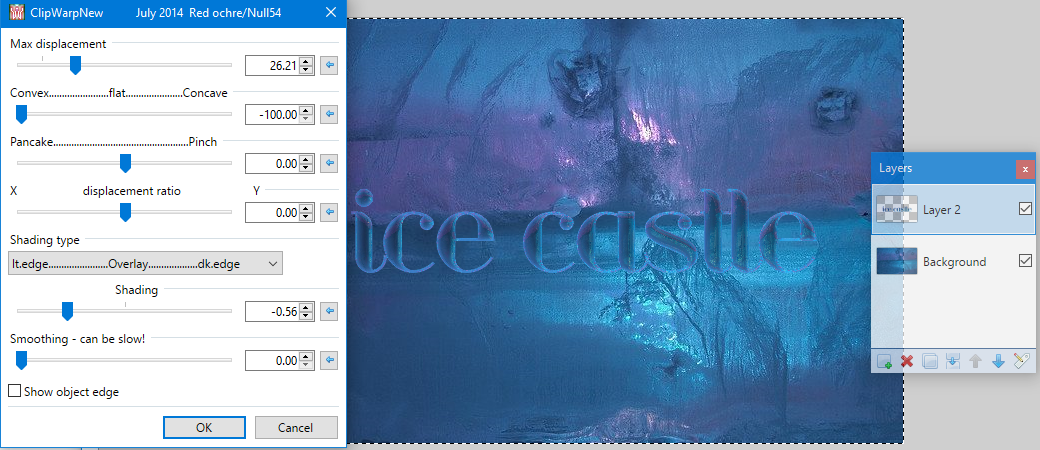
5. Copy the background layer to the clipboard (Ctrl A, Ctrl C, Ctrl D) and select the Text layer and run Clipwarp plugin (older or newer version).
6. Duplicate Text layer. Change the blending mode either to Additive or Screen.
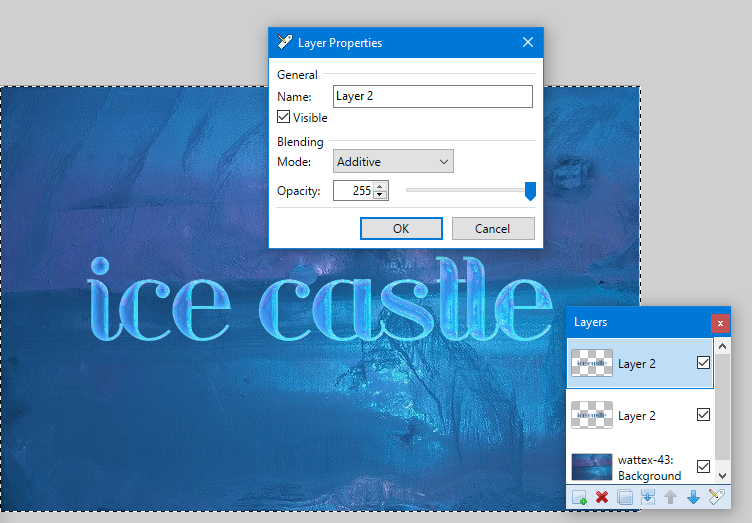
7. Then merge the two Text layers into one. Now we are done with the first part.
Second Part : Starry Background
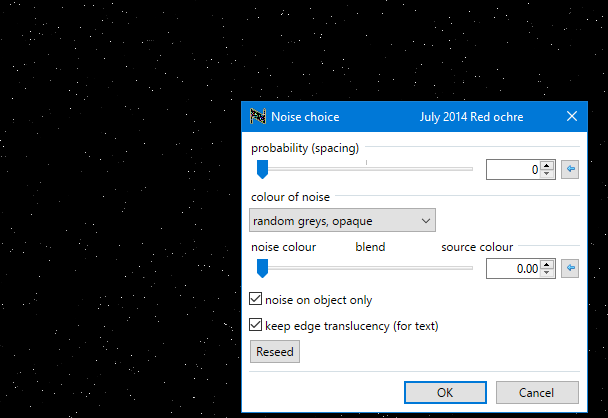
1. Create a new layer between Text layer and Background layer. Fill it with the color black.

2. Add noise to this new layer. My personal choice is @Red ochre's Noise Choice plugin.
3. Go to Effects>Color>Threshold. Run that in this setting :

4. Duplicate the layer twice so you have 3 layers of dots.
5. On the first Layer (lower) layer, run Motion Blur at this setting :
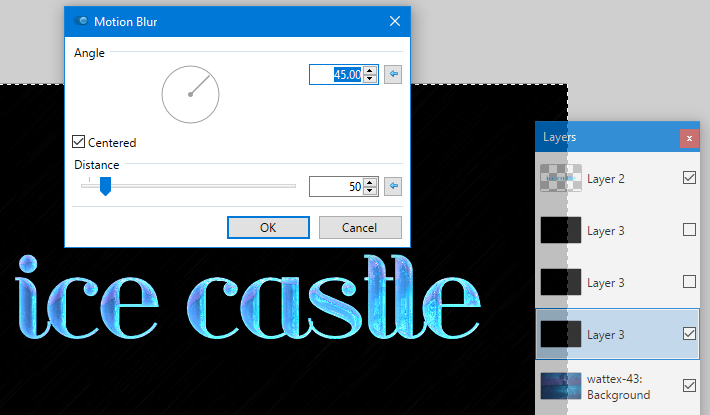
6. Run Motion Blur on second Layer layer on this setting :

7. Run Gaussian Blur with this setting on the third layer of Layer 3 :

8. Change the blending mode of the second and third layers to Screen. Merge these 3 layers into one and rename the layer 'Sparkles'.
9. Copy the Sparkles layer three times, to make four layers of Sparkles. Rename them so you don't get confused.
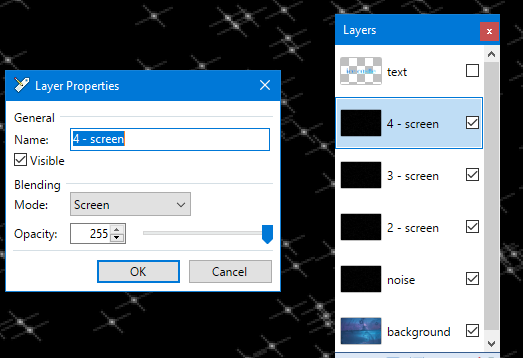
Change the blending mode of Sparkles2, Sparkles3 and Sparkles4 to Screen. Merge those layers down to the Sparkles layer. Then change the blending mode to Color Dodge and you will see stars on your background image :

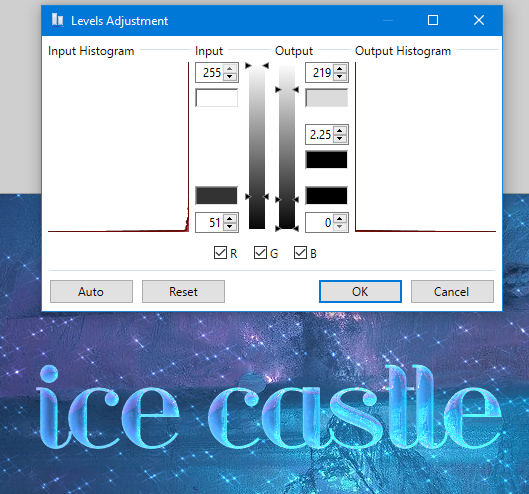
10. Duplicate Sparkles layer, and run Gaussian Blur on duplicated layer with strength 2px.
Run Levels to adjust the brightness of the stars.

11. Copy the Background layer. Set the blending mode to Overlay.

Run Gaussian Blur slightly to your liking.
Set Opacity level to your liking.
And now we are done !
Hopefully this tutorial can put smiles in @johnnysdream face and so to the others who are interested in making a starry background.
Can't wait to see what the others can do with this tutorial !
All The Best !
-
4
-
-
-
I have the original photo. I'll will attach it.
Thanks.
Hi mackenzieh...
I have figured out the nature of your problem...
To solve it : Simply press 'Shift' key while you draw the ellipse selection on the layer. Next do inverse selection, then deleting the unwanted area. Re-select the area again by using magic wand on the empty area then do inverse selection. After that, just run the Fish Eye plugin.
Here are what happened after figuring out the problem :

Let me know what happened after you do so.
Extra bonus tip : There're maybe some thin black outline left after running fish eye plugin. Just make it disappear by running AA's Assistant Plugin for several times.
Hoping that it can help you a lot.
All the best !
-
The photo I used was a black pug.
I have attached the photo.
Thanks,
Mackenzie
Welcome !
Okay... Now I can see those dark lines.
However, I'm not sure if that caused by settings you made on fish eye plugin or other things. It can be anything. To figure that out then solving it, I need the same original picture (before you run the plugin on it to emulate what are you doing ) or your blackpug.pdn file. Can you submit any of it to me ?
When I'm really sure what had happened, I'll post the solution ASAP.
Thanks !
-
-
I tried attempting this tutorial and when it comes time for the fish eye effect with your settings, I get 2 dark lines on the image.
Hi mackenzieh !
Thanks for trying this tutorial !
Before saying anything, let me ask you a question...
Are you using the same picture I used as the model for this tutorial ? If not can you show me a screenshot, how does those dark lines looked like, or send me your pdn file to my inbox ?
I need your answer for a clarification.
Thanks !
-
*nodded*
Thanks everyone !
-
Hi,
It's so frustrating that this plugin isn't compatible for PDN 4.0x. :
http://forums.getpaint.net/index.php?/topic/5014-fast-radial-blur/
Can anyone modify it so that it can be used in PDN 4.0x ?
Thank you so much !
-
Thanks everyone for the clarification.
I'll stay with my entry.
-
DrewDale & Pixie, thank you so much !
That's a nice attempt, Pixie. I think you can do it much better than me.


 set to Global, select the text and Invert the selection. Use Bevel Selection @ #7 and alternate lightning direction checked.


SOTW#147 - POLL - 3 shapes and 3 colours.
in The Archives
Posted
Congratulation Pixey and all contestants !