pleabo
-
Posts
23 -
Joined
-
Last visited
Everything posted by pleabo
-
In the Red, Green, Blue and Alpha text boxes, the left and right cursor keys are not operational making it somewhat difficult to edit the equations.
-
Get a Copy of the Source Image in an Effect
pleabo replied to pleabo's topic in Plugin Developer's Central
pyrochild, thank you so much for the help and advice. -
For and effect I am envisioning, I would like to get a copy of the Source Image to display and manipulate in the Effect UI for later saving to the PDN window. Like Liquify does. All my attempts at getting the source image to a PictureBox have failed. Here is one of my attempts at getting the source image: protected override void OnSetRenderInfo(EffectConfigToken parameters, RenderArgs dstArgs, RenderArgs srcArgs) { if (firstTime){ // usually goes three times on the start of the effect?? MessageBox.Show("OnSetRenderInfo"); firstTime = false; PaintDotNet.Effects.FFPConfigDialog m_dlg = new PaintDotNet.Effects.FFPConfigDialog(); m_dlg.pictureBox1.Image = (Image)dstArgs.Bitmap; } base.OnSetRenderInfo(parameters, dstArgs, srcArgs); } This does not change the pictureBox1.Image, nor does anything else that I have tried. Later I need to get the transformed image to dstArgs.Surface. Any help appreciated.
-
I'm finding this plugin useful for one of my tasks - extracting frames from animated GIFs, modifying them and making a sprite sheet (PNG) of the frames for use elsewhere. I also tried to edit an animated GIF and save it as an animated GIF. The saved GIF did not use the original optimized palette and ended up with a dithered (lower quality) image. Is there any way to use the original optimized palette? I looked extensively through this forum. Here is my example: Click to enlarge PatrickL
-
Codelab cs0012 problem with default code
pleabo replied to Red ochre's topic in Plugin Developer's Central
FYI - I liked the Color Phase Shift effect and decided to try it in a Filter Factory format. (See null54's PdnFF in the Plugins - Publishing Only section) Works fine!! Save the following as "Psychocolor0.txt" and Load into null54's PdnFF: Category: Color Title: Psychocolor - Color PhaseShift Copyright: Freeware Author: Red ochre / [dpl port] R: put(r*D/255,0),128 + 127*sin(get(0)+ctl(0)*4)/D G: put(g*D/255,0),128 + 127*sin(get(0)+ctl(0)*8)/D B: put(b*D/255,0),128 + 127*sin(get(0)+ctl(0)*12)/D A: a ctl[0]: Phase Shift val[0]: 128 These kinds of calculation algorithms work nicely in Filter Factory format. edit1: updated to latest Red ochre equations. pleabo -
This is a slightly different Color Replacement plugin. Another replace tool which might work better on some images. Color replacement is very image dependent, and different approaches work better on different images and even when it is pretty good, you may have to touch it up to your satisfaction. This one allows source color selection with either a cursor on a thumbnail of the image, or the using the primary color. Then selection discrimination can be with either Hue or RGB and there is a tolerance slider. The selected color may be made Transparent, replaced with a Solid Color or replaced with a Hue The selection can be Reversed. i.e. change the colors not selected If replacing with hue, the Intensity and Saturation can be modified with sliders The new color is selected with a color wheel Here is the User Interface: (Click to see full size) and some results: (Click to see full size) Works best on images with distinctly different colors. Unzip and place the DLL in the Effects folder. V1.0 DPL Color Replacement.zip and find Effects->Color->Color Replacement
-
I'm really enjoying playing with this plugin. My bride looks delightful with a Joker Grin and Elfin ears. Thanks pyrochild, PatrickL
-
Thanks for your interest. OK, here's the code: #region UICode Pair<double, double> Amount1 = Pair.Create( 0.0 , 0.0 ); // Source Center double Amount2 = 0; // [-180,180] Source Angle double Amount3 = 0; // [-180,180] Destination Angle double Amount4 = 1; // [0.1,10] Zoom int Amount5 = 4; // [1,50] Repetitions byte Amount6 = 0; // Imaging Type|Reflect| Left| Right bool Amount7 = false; // [0,1] Clamp Edge bool Amount8 = true; // [0,1] Ellipse int Amount9 = 0; // [0,512] Border Width (0 for none) bool Amount10 = false; // [0,1] Colored Ellipse Background ColorBgra Amount11 = ColorBgra.FromBgr(0,0,0); // Border/BackGround Color bool Amount12 = false; // [0,1] Distort #endregion // Submenu: Distort // Name: DPL Kaleidoscope // Title: DPL Kaleidoscope // Author: pleabo void Render(Surface dst, Surface src, Rectangle rect) { Rectangle selection = this.EnvironmentParameters.GetSelection(src.Bounds).GetBoundsInt(); int xx, yy; double PI = Math.PI; ColorBgra CurrentPixel; double ctrX = Amount1.First; // Source Center x double ctrY = Amount1.Second; // Source Center y double angleS = Amount2/180*PI; // [-180,180] Source Angle double angleD = Amount3/180*PI; // [-180,180] Destination Angle double zoom = Amount4; // [1,10] Zoom X int nn = Amount5; // [1,50] Number of Reflections byte itype = Amount6; // Reflect| Left| Right bool clmp = Amount7; // [0,1] Clamp Edge bool iselip = Amount8; // Do Elipse int bdr = Amount9; // Border Thickness bool bgclr = Amount10; // [0,1] Do Background Color ColorBgra clrbg = Amount11; // The Background Color bool distort = Amount12; // Distort the Destination int width = src.Width; // Source - Whole Image int height = src.Height; int right = rect.Right; // Selection (Partial Destination) int left = rect.Left; int top = rect.Top; int bottom = rect.Bottom; int dright = selection.Right; // Selection (Whole Destination) int dleft = selection.Left; int dtop = selection.Top; int dbottom = selection.Bottom; int dwidth = dright - dleft; int dheight = dbottom - dtop; double magx = (double)width /dwidth; double magy = (double)height/dheight; double magxy = Math.Min(magx, magy); // Pick smallest side int scx = (int)(ctrX*width /2+ width/2 ); // Source Center XY int scy = (int)(ctrY*height/2+ height/2); int dcx = (int)((dwidth)/2+dleft); // Destination Center XY int dcy = (int)((dheight)/2+dtop); if (itype==0) nn *= 2; // Make visual number of nodes match nn in reflect mode if (distort) nn *= 2; // Keep number of nodes when distorting if (bgclr) bdr=0; // No border if colored background for (int y = top; y < bottom; y++) { for (int x = left; x < right; x++) { CurrentPixel = src[x,y]; if (IsIn(x,y,dleft, dtop, dright-dleft, dbottom-dtop, iselip)) { CurrentPixel = clrbg; // Border color int rmin = Math.Min(dright-dleft, dbottom-dtop)/2; if (bdr<rmin) { // Keep center at clrbg for big border if (IsIn(x,y,dleft+bdr, dtop+bdr, dright-dleft-2*bdr, dbottom-dtop-2*bdr, iselip)) { int dx = x-dcx; int dy = y-dcy; double dist = distort ? 0.5 : 1.0; double angle = dist*nn*(Math.Atan2(dy,-dx)+PI-angleD); int n = (int)(((angle+(2*nn-1)*PI)/(PI/nn*2)+nn/2)/(nn))%(nn); // Section number - 0->(2*Reflections-1) double angleL = (angle-n*2*PI)/(1*nn); // As Is double angleR = 2*PI/(1*nn)-(angle-n*2*PI)/(1*nn); // Mirror switch (itype) { case 0: angle = ((n%2)>0)?angleL:angleR;break; // Alternate case 1: angle = angleL; break; // Left case 2: angle = angleR; break; // Right } double sinxy = Math.Sin(angle-angleS); double cosxy = Math.Cos(angle-angleS); int sx = (int)(dx*magxy); int sy = (int)(dy*magxy); double sxy2 = sx*sx + sy*sy; // Sum of squares double rS = Math.Sqrt(sxy2)/zoom*magxy; // Radius (distance to center)*Konstant xx = (int)(scx + rS*cosxy); yy = (int)(scy + rS*sinxy); if (clmp) { xx = Clamp(xx,width -1); yy = Clamp(yy,height-1); }else{ xx = Repeat(xx,width ); yy = Repeat(yy,height); } CurrentPixel = src[Math.Abs(xx), Math.Abs(yy)]; } } } else CurrentPixel = bgclr ? clrbg : src[x,y]; // BackGround/Original Pixel dst[x,y] = CurrentPixel; } } } // ---------------- Checking for x,y in rectangle or ellipse ------- x2/a2 + y2/b2 = 1 -- public bool IsIn(int x,int y,int rx, int ry, int rl, int rh, bool elips) { bool rc = false; if (elips) { int cx = rx+rl/2, cy = ry+rh/2; int dx = (x-cx)*(x-cx), dy = (y-cy)*(y-cy); float z2 = rl*rl, w2 = rh*rh; rc = (4*(dx/z2+dy/w2)<1); } else rc = (x<rx)?false:(x>(rx+rl))?false:(y<ry)?false:(y>(ry+rh))?false:true; return rc; } // -------------- Clamp iValue to zero and upper --------------- public int Clamp(int iValue, int upper) { return (int)Math.Max(Math.Min(iValue, upper), 0); } // --------------- Repeat iValue below zero and above upper (modulo upper) public int Repeat(int iValue, int upper) { return iValue%upper; } PatrickL
-
Thought you might be interested. Polar checkered tiling by Werner D Streidt is one example TIA if you do. OK, OK, I'll leave you alone, PatrickL
-
WMF (Windows Metafile) file type plugin v1.3.1
pleabo replied to Bruce Bowyer-Smyth's topic in FileType Plugins
Bruce, this plugin works with all of the WMF files I have tried. Very nice. The images always comes out the same size, sometimes smaller than I would like. Since these are vector commands, could they be made to generate the image to fit in the size of the currently open canvas? PatrickL -
The pixel shift is fixed now I continue to be impressed with this integration of the GimpFF code with PDN. What a great way to get compatibliliy. Some more comments: The d dependent constant is PI radians off from GimpFF causing a few different outcomes importing 8bf filters. (Click for larger image) WBNI if when editing the equations, the up/down arrow keys would cycle through the 4 equation text boxes. When getting to more complex equations, the processing becomes larger multiple seconds and starts to feel sluggish when revising the equations, or changing slider values. WBNI changes could be locally in the dialog window on a smaller copy of the underlying image, say 320 pixels wide and then processed (slower) on the fullsize PDN image on OK click. This scaling smaller can be done just by scaling x,y,X,Y,m,M to the image ratio to get the same looking results. PatrickL
-
While browsing, I saw a few references to procedures to create a "Night Vision" look to an image. This is a simple plugin to directly create a Night Vision and Inverted Night Vision look. Also an intensity control slider. Just a simple application of the Green Channel = (r*0.2+g*0.6+b*0.1) while Red=Blue=0. DPLNightVision.zip Unzip to the .../Paint/Effects folder. NightVision will be in the Color section. The User Interface: The Result: PatrickL
-
Thanks Possum and Oma. I've seen both or your artwork, and since I'm artistically challenged I'll be looking forward to seeing what you all can do with this idea. PatrickL
-
Bingo! Thank you. Now I can have some fun. PatrickL
-
RE: Template for Plugin Development using Visual C# 2010 Express - Unsuccessful try! Start with Madjic's Stars plugin source Run through Visual C# 2010 Express conversion wizard - no errors or warnings Change Assembly name and StaticName to V2 Change Build Events path to match my machine - C:\Program Files\Paint.Net\Effects Add PaintDotNet.Base reference Start Debugging (F5) runs nicely, copying the new DLL to the .Effects folder, and PDN starts up with no errors. However, the V2 effect is not showing up in the Render effects list or any place else. Setting break points in various places, the only hit is at StaticName->get. Would appreciate any help with this conversion to C# 2010 Express or another template to use. The goal is to produce a plugin with my design of the Dialog window. TIA, PatrickL
-
This plugin is done. If a moderator chooses, this thread can be moved to Plugins - Publishing Only. PatrickL
-
Thanks for activating the Sliders on non-zero slider value. .TXT is working nicely now. On the pixel shift, it looks like the x value for the red channel is +1. It goes full off early and full on early. Or the GB channels are -1 . Regards, PatrickL
-
I noticed an anomaly in the output of the Rotating Bands gradient equations I posted earlier. A small pixel shift between color channels. The left image is a magnified PdnFF output and shows a one pixel offset of one of the color channels. Not a big deal on hi-res images, but more noticeable on lo-res stuff. (click for larger image) Also, it would be nice if the loaded .afs files would check the Slider Control check box if the value is non zero. You might also take a look at the GUF (Gimp User Filter) format. It is similar to .ini syntax and stores all of the info needed to recreate a filter. Also GUF has a lot of filters already designed. More than 1500 that work with Filter Factory and could work with PdnFF! Save then Load in txt format still doesn't work for me. No equations or slider values. Since I was working on a similar project, I would be glad to test/verify any changes you make and to discuss ideas with you. You can contact me off-forum with e-mail at -- pleabo at comcast dot net. I like this plugin a lot PatrickL
-
Nice Null54. I was working on a similar prototype so have quite an appreciation for your work. You beat me to it!!! Comments: On initial install (copy PdnFF.dll and ffparse_x86.dll to Effects folder) the effect crashes with a Could not find a part of the path 'C:\Users\Patrick\Documents\Paint.NET User Files\PdnFF.xml' error. Manually adding a Paint.NET User Files folder made all well. The Build Filter DLL function worked perfectly, however the Save... as .txt failed and the Save... as .afs was only partially successful with the equations being saved, but not the header info nor the slider info. I use Filter Factory to make grayscale gradients for use as templates for transitions for Movie Maker. Here is an example and test case: Rotating Bands in R put((d+D)*val(0,1,16)/4%256,0),put(((((m/val(1,10,M/2))/2) %2)<1)?get(0):255-get(0),1) in G get(1) in B get(1) in A a set slider 0 (# Vanes) to 128 set slider 1 (# Bands) to 32 As an equation writer, it would be nice if the syntax checking were done on each keystroke to catch mistakes as they occur. PatrickL
-
BTW, here are some video clips made using my original Kaleidoscope effect for Windows Movie Maker over some colorful fractal images. DPL Kaleidoscope and DPL Kaleidoscope2
-
With Rick's suggestion of combobox for Image Type and removing the Distort check box, here is a 750 pixel tall UI version. (Click image for full size) DPLKALsmall2.zip Save the DLL to the Effects folder. Any comments about function?
-
CSM725 and Goonfella. Till I figure out how to rearrange the UI, here is one with the Color Chooser removed. It has a UI about 700 pixels tall. The background/border color is hard coded to dark blue. DPLKALsmall.zip Following is one 690 pixel candidate for what I would like to do: (Click for full size) But so far I don't know how to arrange radio buttons or check boxes horizontally.??
-
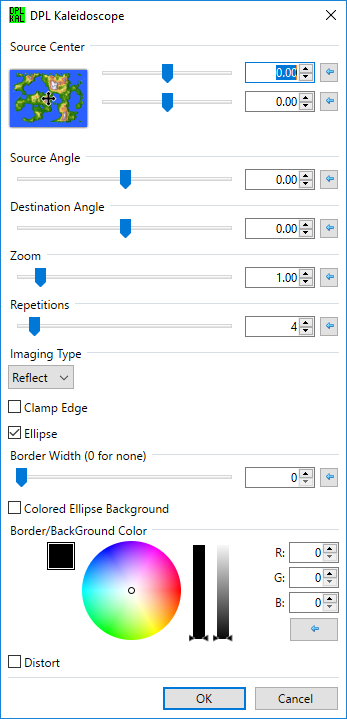
From a newbie, this is a port of some HLSL FX code that I wrote for a Kaleidoscope Effect for Windows Movie Maker 6.0; I just wanted to see how the Paint.Net coding tool Code Lab works and to get some experience with Paint.net and the C# language. It is a similar, but a bit different than the Kaleidoscope Effect that Madjik submitted around 2008. This one adds a center point selector and a source angle rotater. The pie shaped selection is just the image swept out by rotating clockwise 360/n degrees. It is missing Madjik's copy all over all option, show single piece etc. Also the edge of the image can be clamped or repeated. Anyway, just for fun. Here is the DLL DPL KAL.zip (Edit: Upload by EER 16 April 2017) Unzip and place the DLL in the .../Paint.Net/Effects folder. Then DPL Kaleidoscope will show up in the Effect->Distort menu Here is a sample with a elliptical selection followed by a rectangular selection. Also of course the whole canvas can be selected (by selecting nothing). The UI is: The controls are: The Selection Rectangle = Drawing Destination (Lasso, Ellipse and Inverted Selections gives some interesting results) (Source Center) Selector - x y position of the center to be processed (Source Angle) Chooser - Rotate the start of the pie to be copied (Destination Angle) Chooser - Rotate the resulting kaleidoscope image (Zoom) Slider - Zoom in/out on the kaleidoscope image (Repetitions) Slider - Number of copies (Imaging Type) Radio Buttons Reflect, Left, Right (Clamp Edge / Repeat) At Edge Check Box - (Ellipse / Rectangle) Check Box - clip at a rectangle or ellipse representing the selection area (Border Width) Slider (0 for none) - (Colored Background) Checkbox - Surround the selection with a single color (Background Color) Color Wheel - Choose border color and surrounding color when colored background is on. (Distort) CheckBox - Gives a bit of a spherical look. Originally a bug, now featured . Edit: Per Rick suggestion, changed the Image Type radio buttons to a dropdown list. UI is now 780 pixels tall. Also, a later post has a 750 pixel version with the Distort checkbox removed. Comments welcome, pleabo